
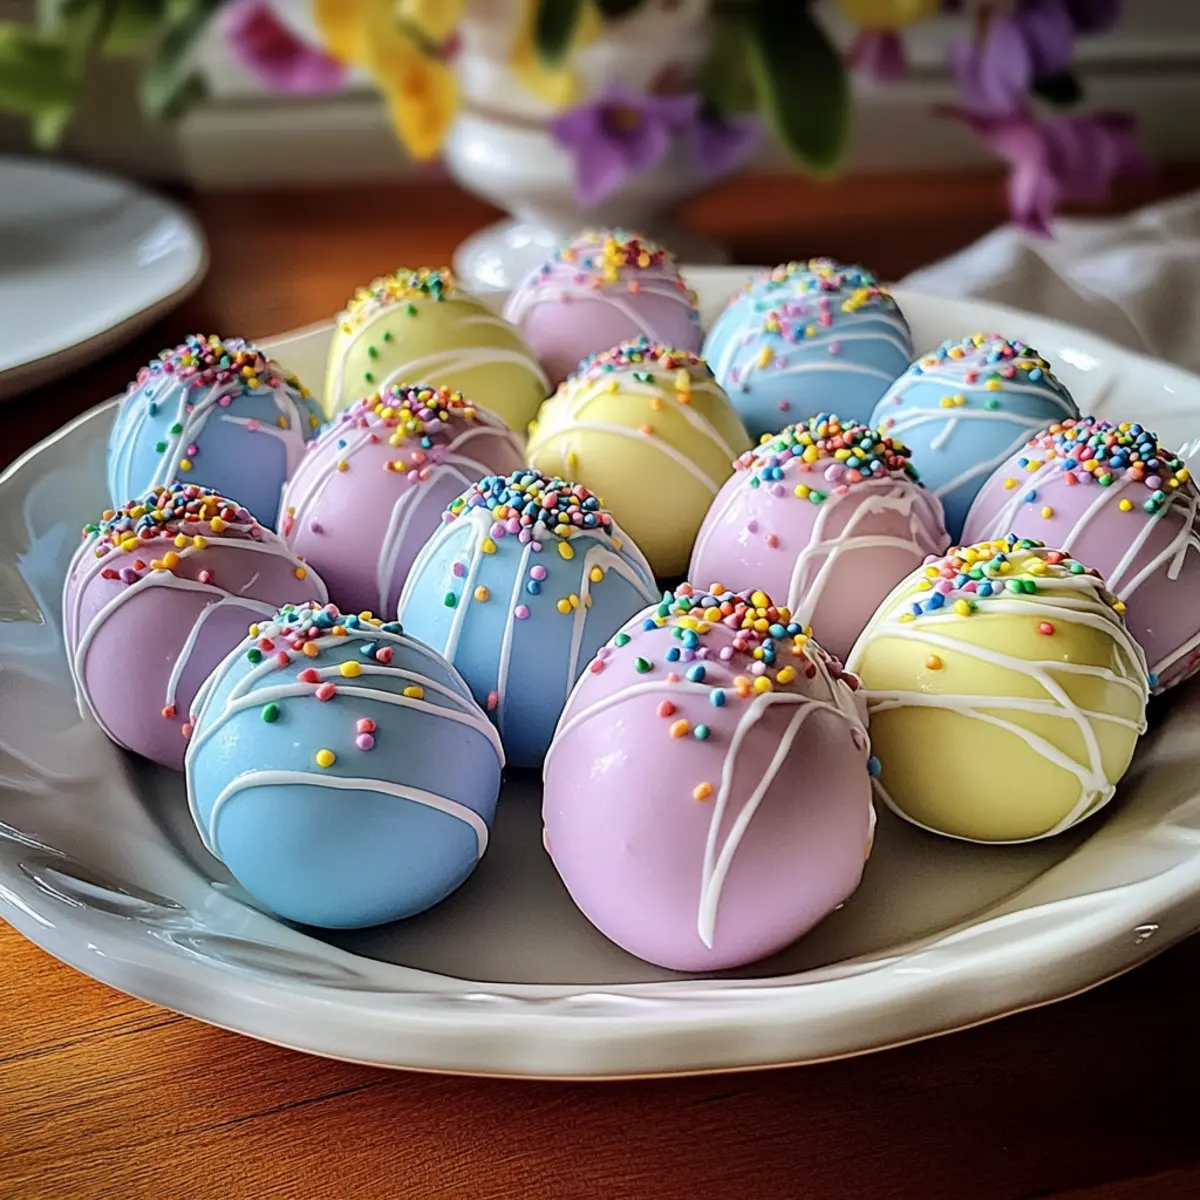
The moment my little ones caught sight of their Easter baskets, I knew I had to step up my game. Who can resist the allure of festive sweets, especially when you can whip up something so delightful and easy? Enter the Easter Egg Oreo Balls—a no-bake treat that marries the iconic taste of Oreos with creamy cream cheese, all wrapped in a colorful candy shell. This recipe is a total lifesaver for busy home cooks who want to impress their family and friends with little effort! Not only are they a crowd-pleaser, but their customizable decorations make them perfect for kids and adults alike. Can you see the joy on their faces already? Let’s dive into how to make these festive delights that are sure to be the highlight of your Easter celebrations!

Why Are Easter Egg Oreo Balls Amazing?
No-Bake Convenience: These treats are super easy to whip up with no oven required, making them perfect for busy days!
Festive Fun: Their colorful candy coating and unique egg shape bring a playful touch to any Easter celebration.
Family-Friendly: Kids will love both making and eating these delicious bites, ensuring smiles all around.
Customizable: Feel free to get creative with your toppings! Different sprinkles or even drizzles of chocolate can make each batch unique. If you enjoy treats like these, check out Oreo Balls Bake for another easy dessert option.
Rich Flavor: The creamy cream cheese and chocolatey Oreos create a heavenly combination that everyone will crave.
Easter Egg Oreo Balls Ingredients
• Get ready to create these delightful no-bake treats!
For the Oreo Mixture
- Oreo cookies – These provide the deep chocolate flavor and structure needed for a rich treat.
- Cream cheese – Adds an ultra-creamy texture; feel free to substitute with reduced-fat or dairy-free options for a lighter twist.
- Vanilla extract (optional) – A splash of this enhances the overall flavor beautifully.
For the Coating
- White candy melts (or white chocolate chips) – These offer a smooth outer shell; if using chips, mix in 1 tsp of coconut oil for better melting results.
- Pastel food coloring – Essential for creating those vibrant Easter hues; gel colors work best for concentrated colors.
For Decoration
- Sprinkles or sanding sugar (optional) – Use these to add a festive touch and make your treats visually pop!
These Easter Egg Oreo Balls are bound to impress at any gathering, so gather your ingredients and let’s get rolling!
Step‑by‑Step Instructions for Easter Egg Oreo Balls
Step 1: Crush the Oreos
Begin by crushing the Oreo cookies into fine crumbs to create a rich base for your Easter Egg Oreo Balls. Use a food processor for ease, pulsing until you have a sandy texture. If you don’t have a food processor, simply place the cookies in a zip-top bag and crush them using a rolling pin. Set the crumbs aside in a large mixing bowl.
Step 2: Mix the Filling
In the same bowl, add the softened cream cheese to your crushed Oreos. Use a spatula or mixing spoon to blend the ingredients together until a thick, cohesive dough forms, resembling cookie dough. If you’d like to enhance the flavor, consider adding a splash of vanilla extract. This mixture should be well-combined, with no visible streaks of cream cheese remaining.
Step 3: Shape the Balls
With your blends ready, scoop out about one tablespoon of the Oreo mixture. Roll it between your palms to form an egg shape, about 1.5 inches long. Place each shaped egg onto a parchment-lined baking sheet to prevent sticking. Repeat this process until you’ve used up all the mixture, ensuring each egg is neatly placed with some space between them.
Step 4: Chill the Eggs
Next, it’s time to firm up your Easter Egg Oreo Balls. Transfer the baking sheet to the refrigerator and let them chill for at least 30 minutes. For a quicker option, you can freeze them for about 15 minutes instead. The goal is for the balls to solidify, making them easier to dip later in the coating.
Step 5: Melt the Coating
While your Oreo balls chill, prepare the coating by melting the white candy melts in a microwave-safe bowl. Heat in 20-second intervals, stirring in between each until fully melted and smooth. If you opt for white chocolate chips, mix in 1 teaspoon of coconut oil to help achieve a silky consistency. This will create a beautiful outer shell for your Easter Egg Oreo Balls.
Step 6: Color the Coating
Once your candy melts are melted and smooth, divide the mixture into small bowls if using multiple colors. Mix in your desired shades of pastel food coloring, ensuring it’s well incorporated. The vibrant colors will add a festive touch to your Easter Egg Oreo Balls, so have fun with this step and create a rainbow of options.
Step 7: Dip the Eggs
Using a fork, carefully dip each chilled egg into the melted candy coating, ensuring it is completely covered. Lift it out and gently tap the fork on the edge of the bowl to let any excess chocolate drip off. Return the coated egg back onto the parchment-lined baking sheet. Repeat this process for all eggs, making sure to work quickly before the coating begins to set.
Step 8: Decorate for Fun
Before the coating solidifies completely, now is the time to get creative! Sprinkle your choice of colorful sprinkles or sanding sugar over the top of each coated egg. You can also drizzle some additional melted chocolate on top for extra flair, making each Easter Egg Oreo Ball uniquely festive!
Step 9: Set the Coating
Finally, allow the decorated Easter Egg Oreo Balls to set either at room temperature for about 15 minutes or pop them into the refrigerator for 10 minutes to speed up the hardening process. Once set, they can be enjoyed or stored, and you’ll have a delightful no-bake treat ready to brighten any Easter gathering!
Expert Tips for Easter Egg Oreo Balls
-
Combine Ingredients Well: Ensure the Oreo mixture is fully blended; this prevents crumbly treats and enhances the creamy texture of your Easter Egg Oreo Balls.
-
Chill for Best Results: Don’t skip chilling the formed eggs! This step makes coating them much easier and helps maintain their shape during dipping.
-
Choose Quality Coating: Use high-quality candy melts or chocolate for a smooth finish; this enhances both the look and taste of your no-bake dessert.
-
Creative Coating: Be bold with toppings! Use different sprinkles or even drizzle with contrasting colors of chocolate for festive flair on your Easter Egg Oreo Balls.
-
Storage Tips: Keep these treats fresh by storing them in an airtight container in the fridge to last up to 5 days—if they last that long!
Make Ahead Options
These Easter Egg Oreo Balls are perfect for meal prep, allowing you to enjoy delightful treats without the last-minute rush! You can prepare the Oreo mixture up to 24 hours in advance by mixing the crushed Oreos and cream cheese, then shaping them into balls and refrigerating. This ensures they stay fresh and maintain a creamy texture. Additionally, you can dip them in the candy coating and decorate them the night before your event; simply store them in an airtight container in the fridge. When it’s time to serve, let them sit at room temperature for about 10 minutes for the best flavor. With these make-ahead tips, you’ll have a festive treat ready to impress with minimal effort!
What to Serve with Easter Egg Oreo Balls
Elevate your Easter celebration with delicious pairings that create a joyful feast everyone will love.
- Fluffy Vanilla Cupcakes: Light and airy, these sweet treats provide a lovely contrast to the rich Oreo balls, adding a delightful bite-sized sweet option.
- Fresh Fruit Salad: A refreshing mix of seasonal fruit adds a burst of color and a juicy balance to the sweetness of the Easter Egg Oreo Balls. Think strawberries, blueberries, and kiwis!
- Chocolate Milkshake: Creamy and indulgent, a chocolate milkshake mirrors the chocolatey flavors of the Oreo balls while delighting guests of all ages.
- Mini Carrot Cakes: These festive cakes are not only thematically appropriate for Easter but also offer a deliciously spiced alternative to enjoy alongside the sweets.
- Bunny-Themed Cheeseboard: Curate a fun cheeseboard with assorted cheeses, crackers, and bunnies made from fruits and veggies for a playful contrast to the treats.
- Sparkling Lemonade: Light and fizzy, this drink complements the sweetness of the Oreo balls beautifully while adding a refreshing zing to your spread.
With these pairings, your Easter gathering is set to be a memorable celebration filled with joy and delicious flavors!
Easter Egg Oreo Balls Variations
Feel free to get creative and make these festive treats your own, with delightful twists that everyone will love!
-
Golden Oreo Twist: Use Golden Oreos instead of regular Oreos for a lighter, buttery flavor profile that’s just as delicious.
-
Dark Chocolate Coating: Swap out the white candy melts for dark chocolate to satisfy those chocolate cravings and add a rich twist.
-
Healthier Option: Replace candy coating with shredded coconut for a tropical vibe that keeps things a bit lighter. It adds chewiness and flavor!
-
Nutty Delight: Add finely chopped nuts like walnuts or pecans into the Oreo mixture for a satisfying crunch. It pairs beautifully with the creamy filling.
-
Minty Fresh: Mix in mint extract with the cream cheese filling to create a refreshing flavor reminiscent of mint chocolate treats.
-
Spice It Up: A pinch of cinnamon or nutmeg in the oreo mixture can add a warm, cozy flavor, perfect for holiday gatherings.
-
Choco-Peanut Butter Swirl: Blend in peanut butter to the cream cheese filling for a nutty, rich take that complements the chocolate wonderfully.
If you enjoy these variations, why not check out how to make Oreo Cheesecake Cookie for another yummy treat? Or try the festive Funfetti Oreo Icebox for something different this holiday season!
Storage Tips for Easter Egg Oreo Balls
Fridge: Store Easter Egg Oreo Balls in an airtight container for up to 5 days. This keeps them fresh and prevents them from drying out.
Freezer: For longer storage, freeze the Oreo balls in a single layer on a baking sheet, then transfer them to an airtight container or freezer bag. They can last up to 2 months this way.
Thawing: When ready to enjoy, thaw in the refrigerator overnight or at room temperature for about 30 minutes. Avoid using a microwave as it may compromise the texture.
Reheating: These treats are best enjoyed cold; however, you can slightly warm them in the microwave for a few seconds if desired, but be cautious not to melt the coating!

Easter Egg Oreo Balls Recipe FAQs
What is the best way to choose Oreos for this recipe?
Absolutely! When selecting Oreos, look for cookies that are fresh and free of any visible damage. Avoid any packages with dark spots all over, as those may indicate old cookies. Regular Oreos work great, but you can also experiment with seasonal flavors like Pumpkin Spice or Peppermint during their respective seasons for a fun twist.
How should I store Easter Egg Oreo Balls?
Very! To keep your Easter Egg Oreo Balls at their best, store them in an airtight container in the refrigerator. This method will preserve their freshness for up to 5 days. If you need to store them longer, you can use the freezer method, which keeps them good for about 2 months.
Can I freeze Easter Egg Oreo Balls? If so, how?
Sure thing! To freeze these delightful treats, first place them in a single layer on a baking sheet and freeze until firm, about 1 hour. Then, transfer them to an airtight container or freezer bag. Be sure to separate layers with parchment paper to prevent sticking. Thaw them in the refrigerator overnight or let them sit at room temperature for about 30 minutes before enjoying!
What should I do if my Oreo mixture is too crumbly?
No problem! If your mixture feels crumbly and doesn’t hold together well, it’s likely that the cream cheese isn’t mixed in thoroughly. Simply return the mixture to the bowl, add a little more softened cream cheese, and mix well. You can also try chilling the mixture for about 10 minutes before shaping it into egg forms. This should help it bind better!
Are there any dietary considerations I should be aware of?
Certainly! These Easter Egg Oreo Balls contain dairy and are rich in sugar, so they may not be suitable for those with lactose intolerance or certain allergies. If you’re making them for someone with dietary restrictions, consider using lactose-free cream cheese or gluten-free Oreos to accommodate their needs. Always double-check ingredient labels to ensure safety.
Can pets eat Easter Egg Oreo Balls?
No, please! These treats are not safe for pets due to the chocolate content and sugar. It’s best to keep them out of reach and offer your furry friends their own special treats instead.

Easter Egg Oreo Balls: No-Bake Treats Kids Will Adore
Ingredients
Equipment
Method
- Crush the Oreo cookies into fine crumbs using a food processor or a zip-top bag and rolling pin.
- Mix in the softened cream cheese until a thick dough forms, adding vanilla extract if desired.
- Scoop about one tablespoon of the mixture and roll it into an egg shape.
- Chill the shaped eggs in the refrigerator for at least 30 minutes to firm them up.
- Melt the white candy melts in a microwave-safe bowl, stirring at 20-second intervals.
- Color the melted coating with pastel food coloring.
- Dip each chilled egg into the coating, ensuring it's fully covered.
- Sprinkle with colorful sprinkles or sanding sugar before the coating hardens.
- Allow the coated eggs to set at room temperature or refrigerate for faster hardening.
Leave a Reply