
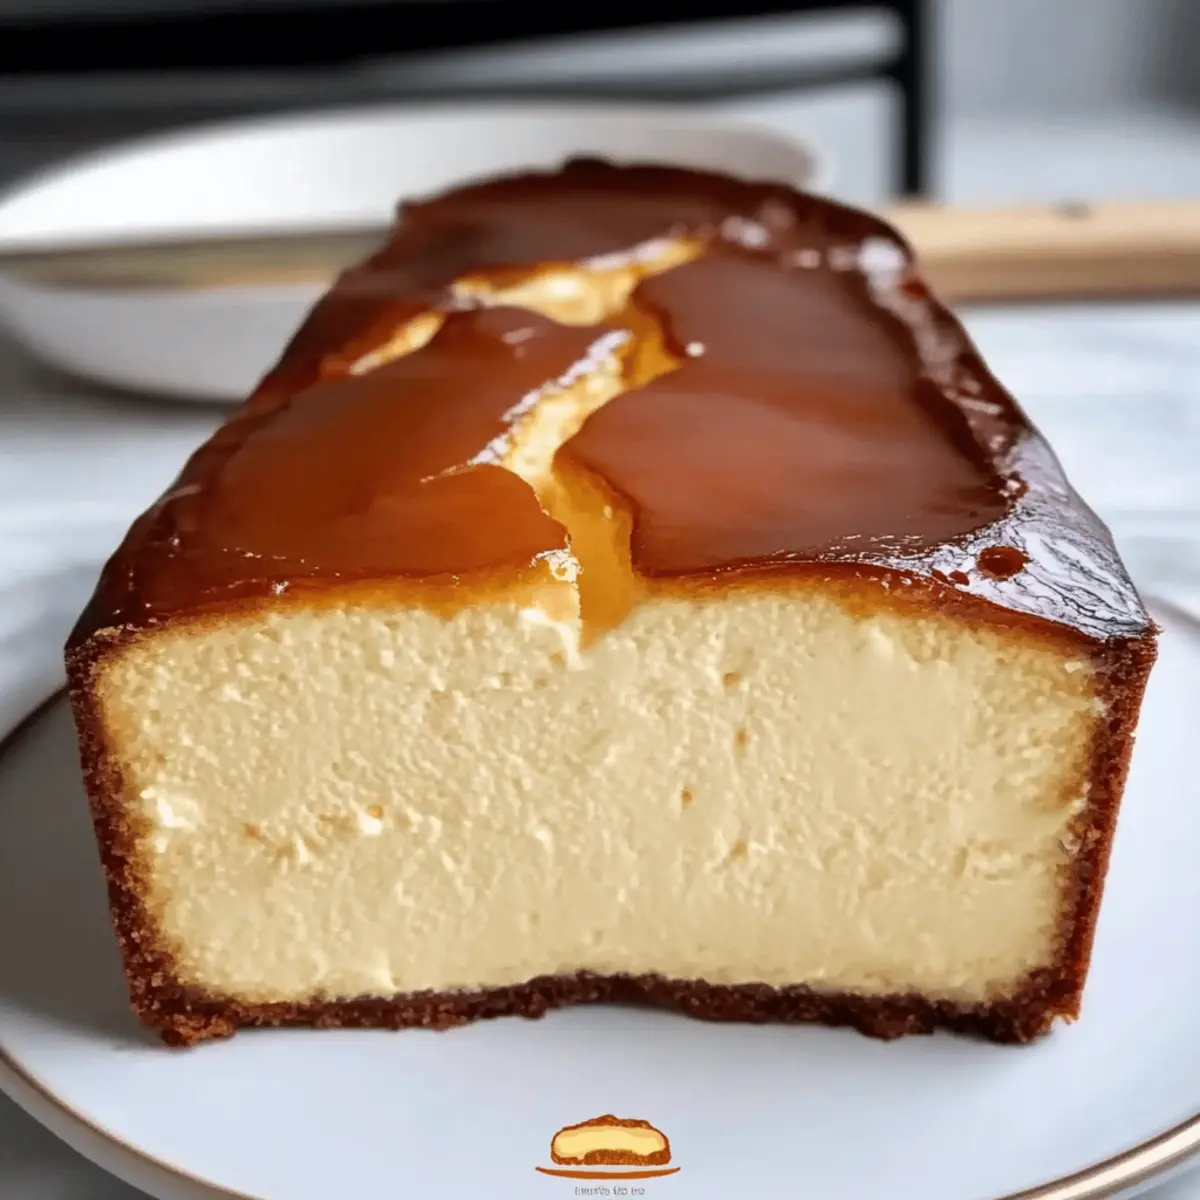
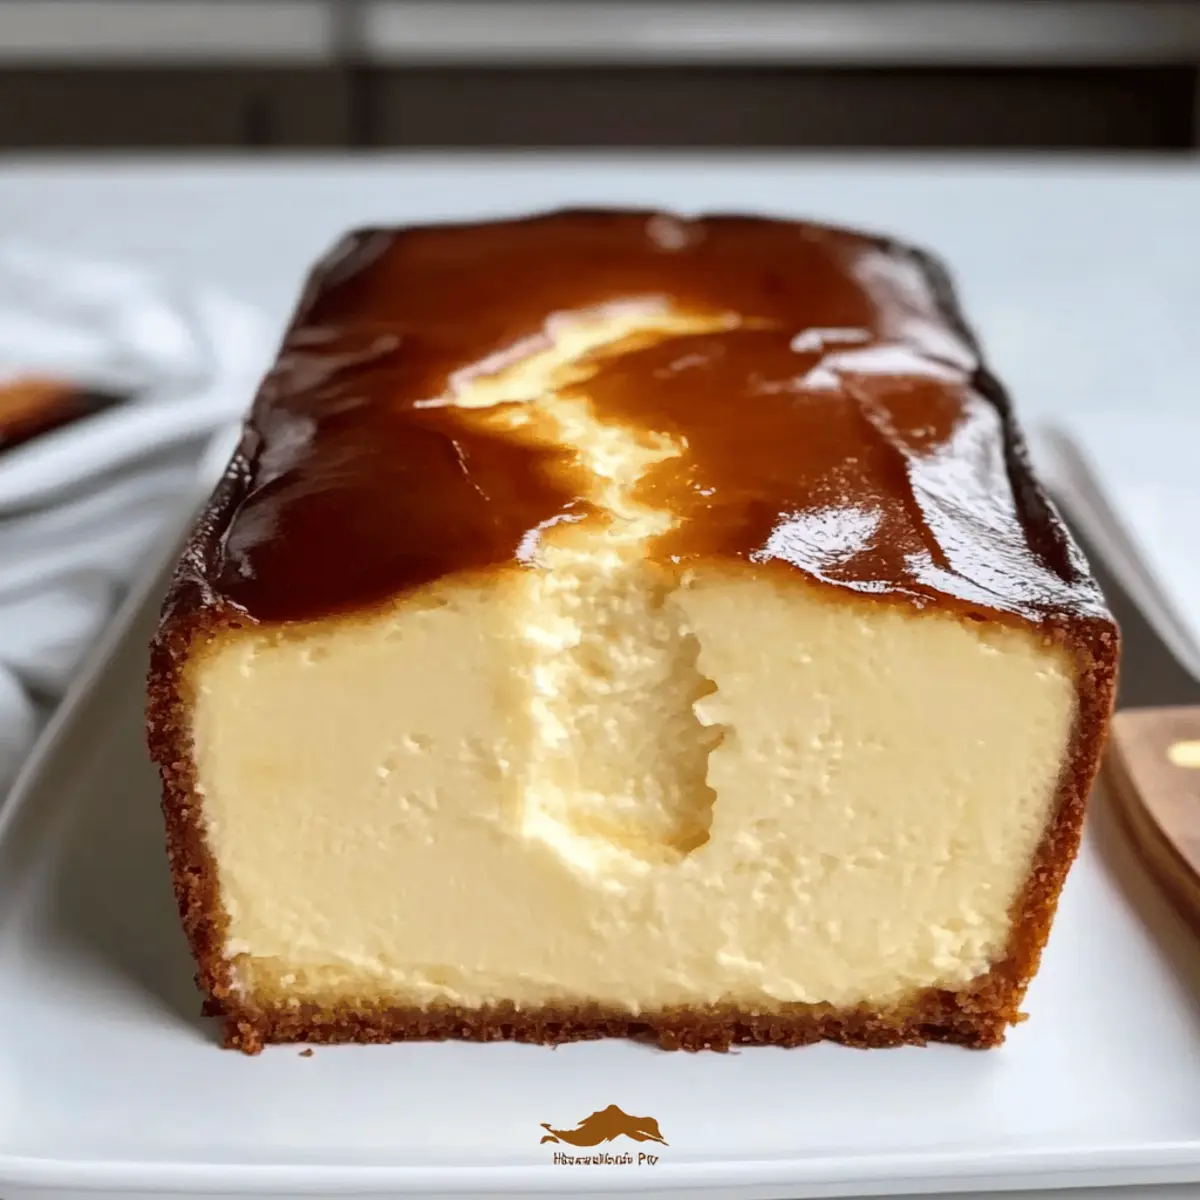
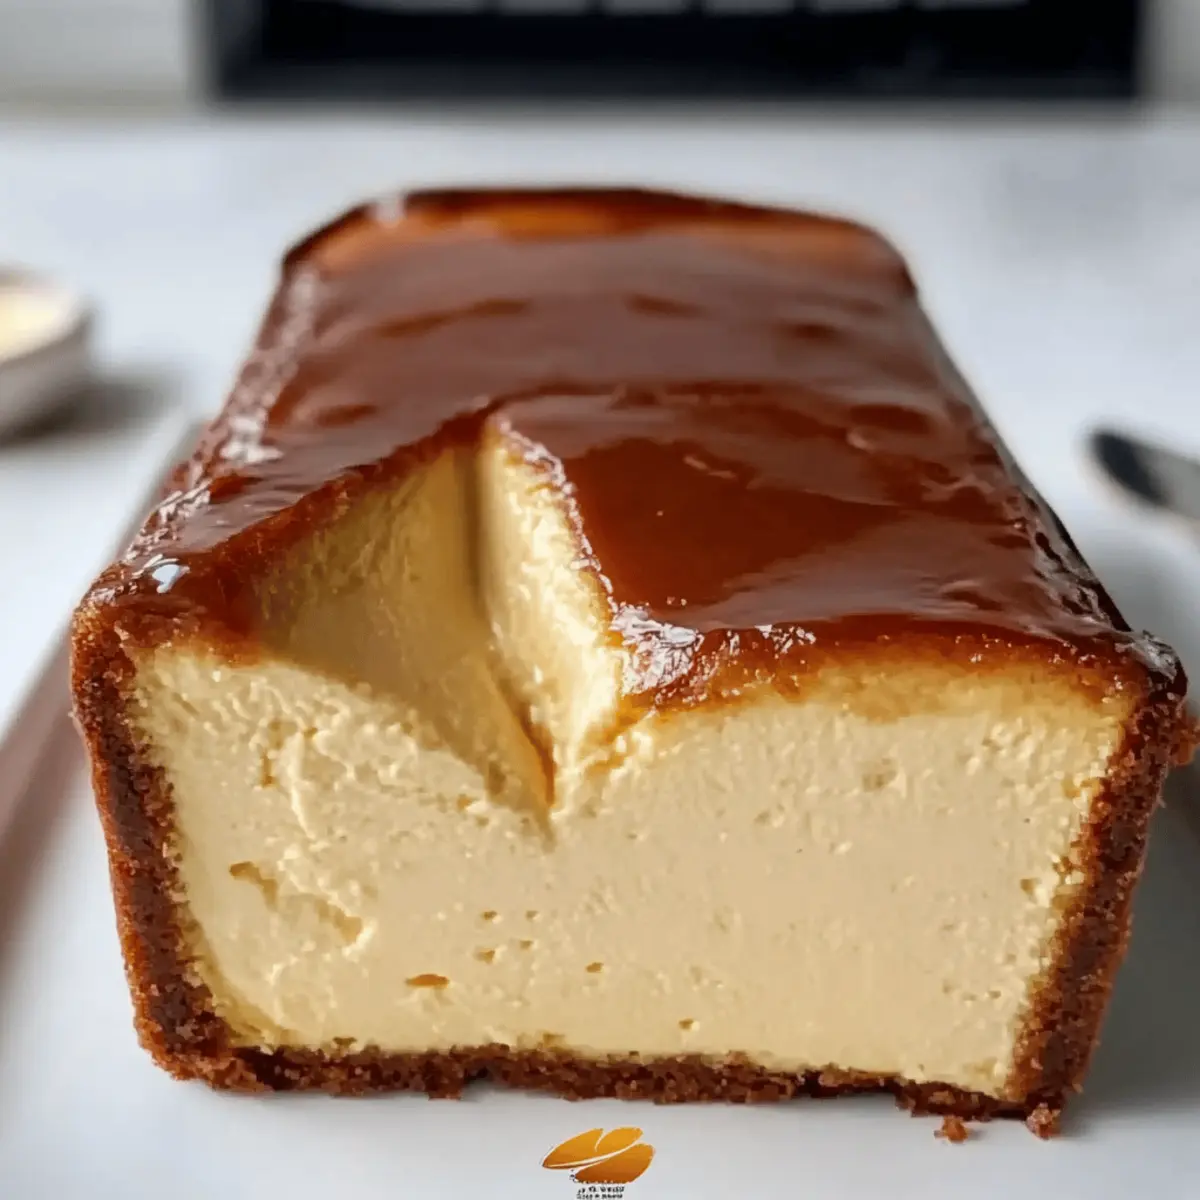
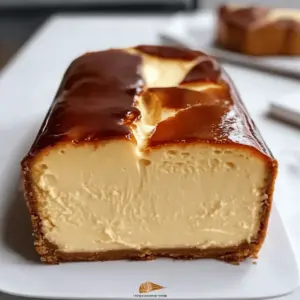
Just last week, I found myself in a playful battle with some leftover cream cheese, and out of that mini crisis emerged something extraordinary—my very own Burnt Basque Cheesecake in a Loaf Pan. This delightful variation captures the essence of the traditional dessert in a smaller, more manageable size, perfect for those of us who crave a sweet indulgence without the commitment of a full-sized cheesecake. With its luscious custard-like center and that iconic, charred top, it’s bound to impress your guests, or serve as a little self-care treat just for you. Plus, this recipe is wonderfully easy to whip up and can easily accommodate gluten-free needs. Curious about how to create this creamy masterpiece? Let’s dive in!
Why Choose This Loaf Pan Cheesecake?
Easy to Make: This Burnt Basque Cheesecake in a Loaf Pan is a breeze, requiring just a few simple ingredients and minimal effort, making it perfect for both novice and seasoned bakers.
Decadent Flavor: Enjoy rich and creamy bites with a unique charred flavor that sets this dessert apart from typical cheesecakes.
Small-Batch Delight: Ideal for smaller get-togethers, this recipe delivers all the cheesecake goodness without the excess, perfect for indulgent evenings at home.
Gluten-Free Option: The adaptable ingredients allow for a gluten-free version by swapping in your favorite blend, ensuring everyone can enjoy a slice!
Impressive Presentation: Its rustic look and delightful texture make this cheesecake a showstopper on any dessert table, guaranteed to wow your friends and family.
Want to explore more delicious cheesecake variations? Check out my recipes for Brownie Cheesecake Sweet and Coffee Cheesecake Luscious for additional sweet treats!
Burnt Basque Cheesecake Ingredients
Discover the key components to create a delightful Burnt Basque Cheesecake in a Loaf Pan!
For the Cheesecake Base
- Cream Cheese – Provides richness and creaminess. Use full-fat for the best texture; low-fat can be substituted but may result in less smoothness.
- Granulated Sugar – Adds sweetness. No specific substitutions noted for this classic ingredient.
- Eggs – Acts as a binder and helps create the custard-like texture. Ensure they are at room temperature for better incorporation.
- Heavy Cream – Enhances creaminess and flavor. While substitutions are not typical, alternatives can be used if you prefer a lighter option.
- All-Purpose Flour – Adds slight structure and stability. Can be replaced with a gluten-free flour blend to fit dietary needs.
- Sea Salt – Enhances flavor. This ingredient is essential for balancing the sweetness.
Enjoy whipping this delicious dessert, where each ingredient plays a vital role in crafting the perfect slice of decadence!
Step‑by‑Step Instructions for Burnt Basque Cheesecake in a Loaf Pan
Step 1: Preheat the Oven
Begin by preheating your oven to a high temperature of 400°F (200°C). This setting is essential for creating that characteristic burnt top while ensuring the cheesecake remains creamy inside. As the oven warms up, take a moment to prepare your loaf pan, which will be the vessel for this indulgent dessert.
Step 2: Prepare the Loaf Pan
Next, ready your 9×5 inch loaf pan by thoroughly buttering it or lining it with parchment paper. This technique will facilitate easy removal of your Burnt Basque Cheesecake once it’s baked. Make sure to cover all areas of the pan to prevent sticking, which helps maintain the cheesecake’s beautiful, rustic shape.
Step 3: Mix Cream Cheese and Sugar
In a mixing bowl, combine the softened cream cheese with granulated sugar using an electric mixer. Blend the ingredients on medium speed until the mixture becomes smooth and creamy, typically lasting about 2-3 minutes. This blend ensures your cheesecake contains an airy texture, setting the foundation for your creamy cheesecake delight.
Step 4: Add Eggs Gradually
Now, crack the room-temperature eggs into the mixing bowl, adding them one at a time to the cream cheese mixture. Mix gently but thoroughly after each addition, ensuring that each egg is fully incorporated before adding the next. This gradual approach guarantees a well-blended batter, essential for the perfect custard-like texture in your Burnt Basque Cheesecake.
Step 5: Stir in Heavy Cream
Once all the eggs are blended, pour in the heavy cream, continuing to mix until smooth. The heavy cream amplifies the richness of the cheesecake, contributing to its decadent mouthfeel. Make sure there are no lumps remaining; a well-combined mixture is key to achieving the silky consistency you desire.
Step 6: Incorporate Flour and Salt
Gently fold in the all-purpose flour and sea salt into the creamy mixture, taking care not to overmix. This step is crucial for creating the structure of your cheesecake without losing its airy quality. Aim for a smooth, homogeneous batter that’s free of visible dry ingredients, indicating that it’s ready for the next step.
Step 7: Pour and Smooth the Batter
Pour the assembled batter into the prepared loaf pan, smoothing the top with a spatula for an even surface. This will facilitate even cooking as it bakes. Visualize the creamy mixture gleaming beneath the surface, preparing to become the show-stopping Burnt Basque Cheesecake that will soon emerge from the oven.
Step 8: Bake in the Preheated Oven
Carefully place the loaf pan in your preheated oven and bake for 40-45 minutes, until the top is deeply golden and caramelized. Keep an eye on the oven’s window to ensure that the cheesecake doesn’t over-brown; a jiggle in the center is perfectly normal and indicates it’s still custardy and luscious.
Step 9: Cool the Cheesecake
After baking, remove the cheesecake from the oven and allow it to cool at room temperature for at least 1 hour. This cooling period helps the dessert develop its flavors and texture. Once cooled, transfer the cheesecake to the refrigerator and let it chill for a few hours or ideally overnight to set fully.
Step 10: Slice and Serve
When you’re ready to serve your Burnt Basque Cheesecake, take it out of the fridge. Allow it to sit for 10-15 minutes at room temperature for optimal slicing. The charred top paired with the silky custard-like center will shine, making each slice a delightful indulgence for you and your guests.
Burnt Basque Cheesecake Variations
Feel free to get creative with your dessert; here are some delightful variations to customize your Burnt Basque Cheesecake in a Loaf Pan!
- Gluten-Free: Substitute all-purpose flour with your favorite gluten-free blend for a deliciously inclusive treat. Enjoy the same rich flavor without the gluten!
- Chocolate Swirl: Fold in melted dark chocolate or cocoa powder into the batter for a decadent twist that chocolate lovers will adore. The added depth of flavor takes this dessert to a whole new level.
- Citrus Zest: Add a teaspoon of lemon or orange zest for a refreshing burst of brightness that enhances the cheesecake’s richness perfectly. This delightful tanginess beautifully complements the creamy texture.
- Nutty Crunch: Sprinkle chopped nuts, like pistachios or hazelnuts, on top before baking for an added crunch and flavor contrast. Your guests will love the delightful surprise in every bite!
- Caramel Drizzle: Finish with a drizzle of homemade caramel sauce or store-bought for an indulgent touch that adds sweet, buttery goodness. Let that luscious caramel dance on your taste buds!
- Berry Topping: Serve with a medley of fresh berries or a berry compote for a pop of color and a tart balance to the creamy dessert. The sweetness of the berries will play harmoniously with the rich cheesecake.
- Spiced Pumpkin: Add pumpkin purée and a tablespoon of pumpkin pie spice for a seasonal twist that elevates this cheesecake into a festive delight. Each bite will remind you of cozy autumn days!
Looking for inspiration? You might also enjoy making a Strawberry Swirl Cheesecake or individual Mini Lemon Cheesecakes for your next sweet gathering!
What to Serve with Burnt Basque Cheesecake in a Loaf Pan
Elevate your dessert experience with delightful pairings that harmonize with the rich flavors of this decadent cheesecake.
- Fresh Berries: Their tartness beautifully contrasts the creamy sweetness of the cheesecake, adding a pop of color and freshness.
- Caramel Sauce: A drizzle enhances the indulgence, creating a silky-smooth addition that pairs irresistibly with the burnt flavors.
- Whipped Cream: Light and airy, it balances the dense texture of the cheesecake, providing a refreshing lift to each slice.
- Chocolate Shavings: Add a touch of decadence; the rich, bittersweet chocolate complements the burnt crust and creamy filling perfectly.
- Espresso or Coffee: A warm cup provides a lovely bitterness that enhances the overall sweetness, making it a great end to a meal.
- Honey Glazed Nuts: The crunch and slight sweetness of nuts offers a delightful contrast, elevating the cheesecake experience with varying textures.
- Vanilla Ice Cream: This creamy companion melts blissfully against the warm cheesecake, creating a comforting combination that’s hard to resist.
- Fruit Compote: A homemade berry or citrus compote adds brightness and a hint of acidity, enriching the flavor profile of your dessert.
These pairings transform your Burnt Basque Cheesecake into a multi-sensory treat, enhancing that perfect moment of indulgence!
Expert Tips for Burnt Basque Cheesecake
Jiggly Center: Expect a slightly jiggly center when you take it out of the oven; it will firm up as it cools.
Chill for Flavor: For the best taste and texture, refrigerate the cheesecake overnight—this allows the flavors to meld beautifully.
Rustic Charm: Embrace the cracks and burnt top; they are part of the cheesecake’s charm and contribute to its unique character!
Slow Cooling: To prevent sinking, let the cheesecake cool slowly in the oven with the door ajar after baking.
Customize Toppings: Experiment with toppings like fresh berries or whipped cream to add a personal touch to your Burnt Basque Cheesecake in a Loaf Pan!
Make Ahead Options
These Burnt Basque Cheesecake in a Loaf Pan options are fantastic for busy home cooks looking to save time without sacrificing flavor! You can prepare the cheesecake batter up to 24 hours in advance; simply mix the ingredients and refrigerate it in the loaf pan covered with plastic wrap. This not only enhances the flavors but ensures the cheesecake remains just as delicious. When you’re ready to bake, just pour the batter into your prepped pan and bake it directly from the fridge. For optimal texture, allow the cheesecake to cool completely after baking; then, refrigerate for at least a few hours or ideally overnight before serving. This makes the cheesecake easier to slice and even more enjoyable!
Storage Tips for Burnt Basque Cheesecake in a Loaf Pan
Fridge: Store your cheesecake in an airtight container in the refrigerator for up to 5 days. This helps maintain its rich flavor and creamy texture.
Freezer: Not recommended for freezing, as the texture may become grainy and lose its creamy consistency once thawed.
Room Temperature: If you plan to serve your cheesecake at a gathering, it can sit at room temperature for about 30 minutes before serving for better flavor.
Reheating: If you’d like to enjoy a slice warm, gently reheat it in the microwave for about 10-15 seconds. Be sure to check for your desired warmth without overheating!
Burnt Basque Cheesecake in a Loaf Pan Recipe FAQs
What type of cream cheese should I use for the cheesecake?
For the best texture, I recommend using full-fat cream cheese. It provides the richness and creaminess that makes this cheesecake truly indulgent. While you can substitute with low-fat cream cheese, keep in mind that it may result in a less smooth and creamy finish.
How do I store the Burnt Basque Cheesecake?
To keep your cheesecake fresh, store it in an airtight container in the refrigerator for up to 5 days. This will help maintain its rich flavor and creamy texture. If you find you have leftovers, be sure to cover them well to prevent any drying out or odor absorption from other items in the fridge.
Can I freeze my Burnt Basque Cheesecake?
Freezing is not recommended for this cheesecake, as the texture may become grainy, and it could lose its creamy consistency upon thawing. Instead, enjoy your cheesecake within those 5 days for the best experience! However, if you’re looking to store it longer, consider baking a smaller batch to avoid waste.
What should I do if my cheesecake is too jiggly?
A slightly jiggly center is normal for a Burnt Basque Cheesecake, as it will firm up while cooling. If you’re concerned, you can try adjusting your baking time by a few minutes — just keep a close eye on the topping; it should be a deep caramelized brown. Trust the process; the rustic appearance adds to the charm of this dessert!
Are there any dietary considerations I should be aware of?
If you’re baking for someone with gluten sensitivities or celiac disease, simply swap the all-purpose flour for a gluten-free flour blend. It’s an easy switch and ensures everyone can savor this delicious treat! Additionally, always make sure to check specific allergens related to the other ingredients if you’re serving guests with dietary restrictions.
How can I enhance the flavor of my cheesecake?
For a little personal touch, consider adding toppings! Fresh berries or a drizzle of caramel sauce complements the flavors beautifully. Additionally, chilling the cheesecake overnight not only enhances its flavor but also creates a more indulgent and creamy texture. This small step really elevates your dessert experience!

Burnt Basque Cheesecake in a Loaf Pan for Ultimate Indulgence
Ingredients
Equipment
Method
- Preheat your oven to a high temperature of 400°F (200°C).
- Butter or line a 9x5 inch loaf pan with parchment paper.
- In a mixing bowl, combine the softened cream cheese with granulated sugar using an electric mixer until smooth.
- Add eggs one at a time, mixing gently but thoroughly after each addition.
- Pour in the heavy cream and mix until smooth and creamy.
- Gently fold in the all-purpose flour and sea salt until well combined.
- Pour the batter into the prepared loaf pan and smooth the top.
- Bake for 40-45 minutes until the top is golden and caramelized.
- Cool the cheesecake at room temperature for at least 1 hour before refrigerating.
- Slice and serve after allowing to sit at room temperature for 10-15 minutes.
Leave a Reply