
As I was preparing for a cozy family game night, I realized I needed a snack that would wow everyone without stressing me out. Enter the Hot Italian Sub Sliders Recipe—the ultimate crowd-pleasing delight that marries the classic flavors of an Italian sub with the bite-sized fun of sliders. These customizable treats are not only quick and easy to assemble, but they also cater to everyone’s taste buds with a variety of deli meats, cheeses, and toppings. Each slider comes topped with a buttery herb mixture that creates a golden, savory crust, ensuring they’re a taste sensation with every bite. So, whether you’re hosting your friends for a football game or just looking for a delicious weeknight dinner, are you ready to dive into this slider adventure?
Why Are These Sliders a Must-Try?
Crowd-Pleaser: These Hot Italian Sub Sliders are guaranteed to impress your family and friends at any gathering!
Customizable Delight: Mix and match different meats and cheeses to create your perfect blend. Whether you prefer classic salami or a spicy kick with jalapeños, the possibilities are endless.
Quick and Easy: With minimal prep time, these sliders are perfect for weeknight dinners or last-minute game day snacks.
Flavor Explosion: Thanks to the buttery, seasoned topping, every bite bursts with robust Italian flavors, reminiscent of your favorite deli sub!
Elevate your meals with these sliders, and if you’re feeling adventurous, check out my Lemon Cheesecake for dessert!
Hot Italian Sub Sliders Ingredients
For the Sliders
- Slider Rolls – Soft sub rolls or slider buns provide the ideal base. Substitution: Any soft bread that holds fillings well.
- Deli Meats – A mix of salami, ham, and pepperoni offers authentic Italian flavor. Substitution: Turkey or roast beef for lighter options.
- Cheese – Provolone or mozzarella for perfect melty texture. Substitution: Any favorite melting cheese like cheddar or gouda.
For the Topping
- Butter – Adds richness and a golden finish. Note: Herb-infused butter can enhance flavor.
- Seasoning – Italian herbs and garlic powder elevate the taste. Note: Fresh herbs can offer a vibrant twist.
These ingredients come together perfectly for the Hot Italian Sub Sliders Recipe, ensuring that every bite is chef-worthy and deeply satisfying. Enjoy!
Step‑by‑Step Instructions for Hot Italian Sub Sliders Recipe
Step 1: Preheat the Oven
Begin by preheating your oven to 350°F (175°C). This step ensures an even and perfectly cooked Hot Italian Sub Sliders when it’s time to bake. A properly preheated oven will help achieve that golden brown crust on top, while the insides remain deliciously gooey and melty.
Step 2: Prepare the Rolls
Take your slider rolls and cut them in half horizontally, creating a top and bottom for each slider. Lay the bottom halves on a baking sheet lined with parchment paper or aluminum foil for easy cleanup. As you arrange them, be sure to leave a bit of space between each roll to allow for even heating.
Step 3: Layer the Deli Meats and Cheese
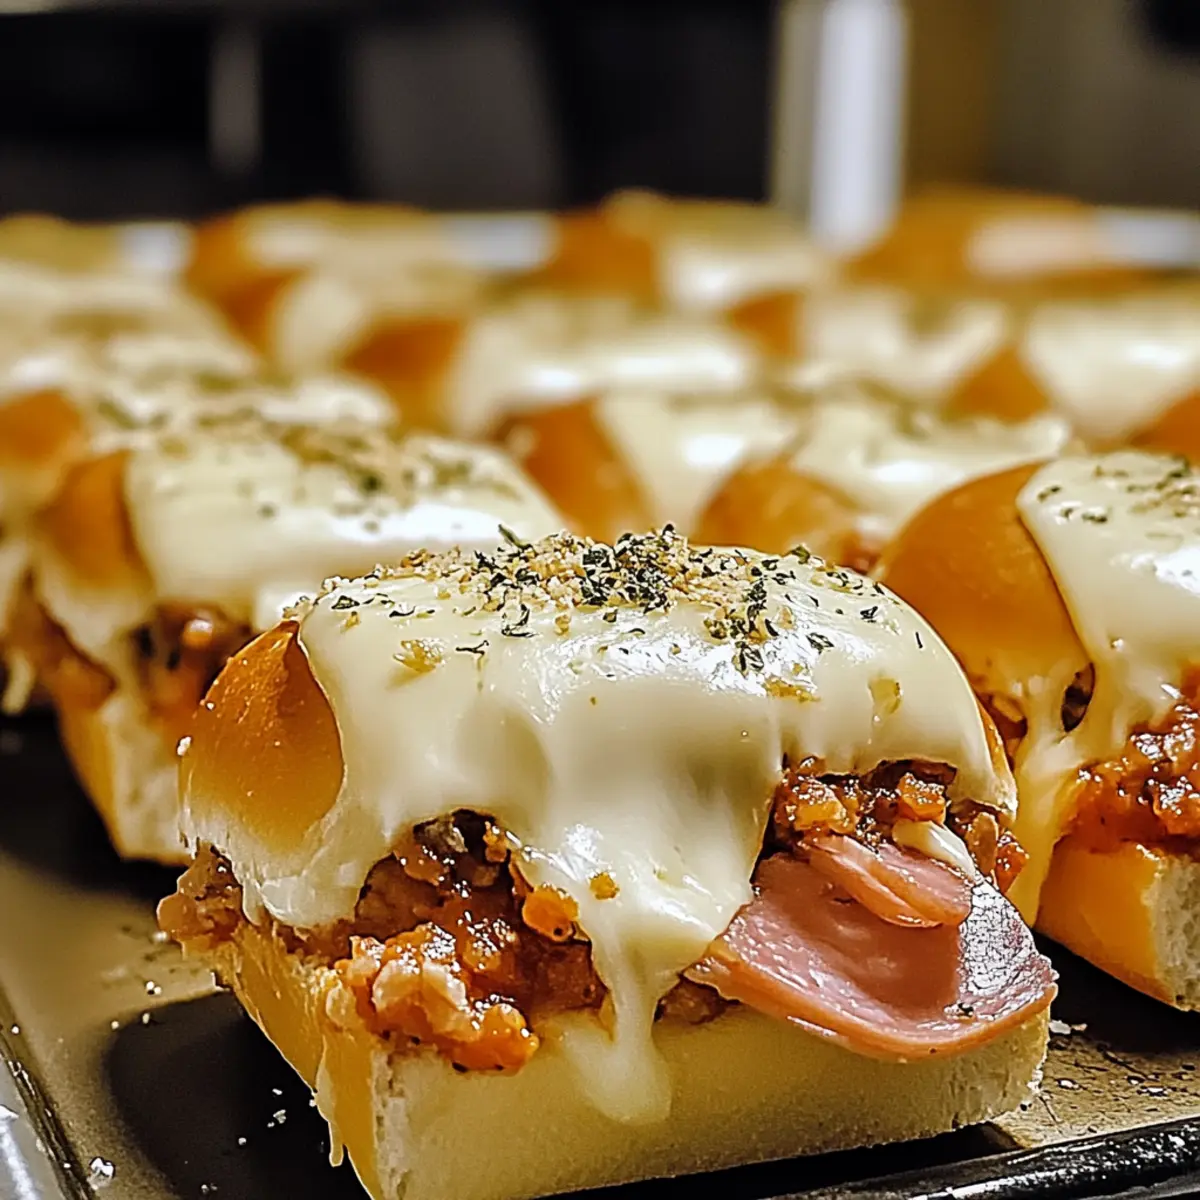
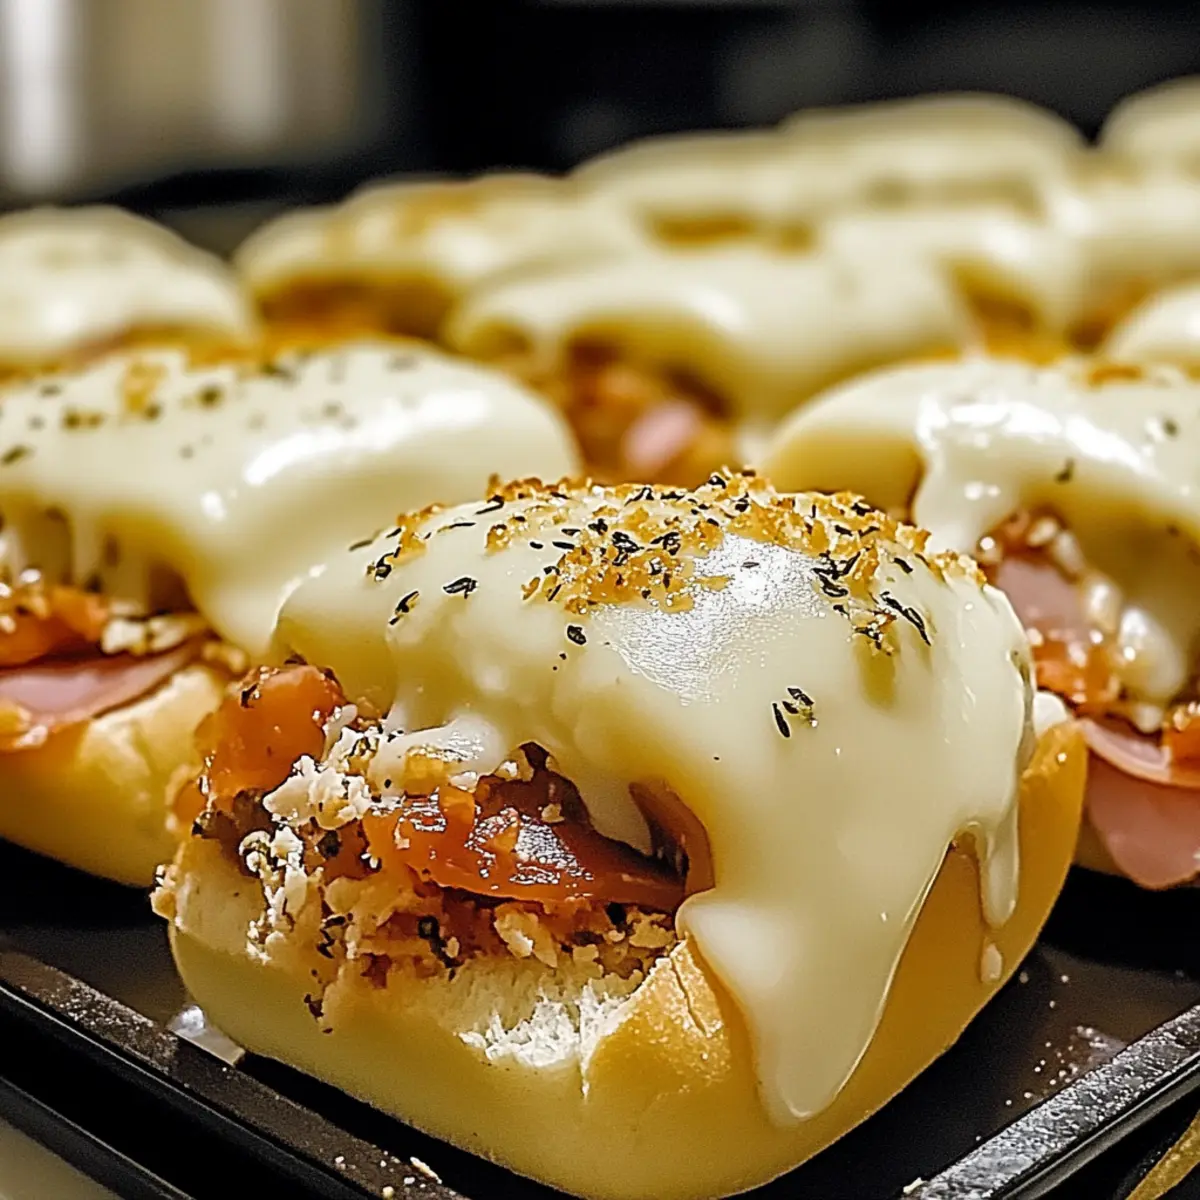
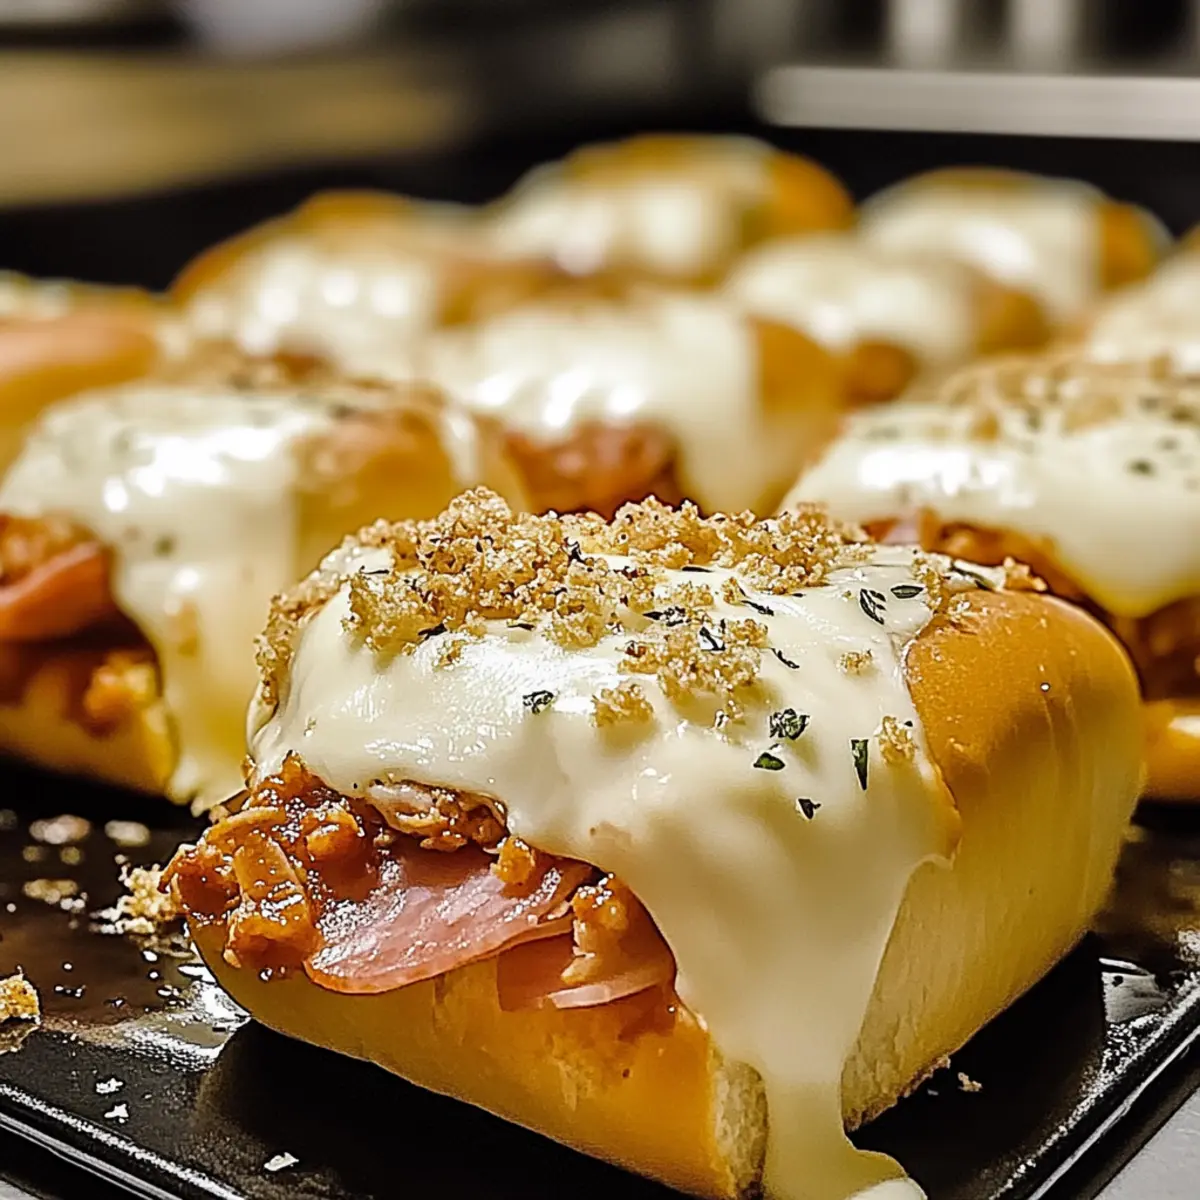
Now, it’s time to layer your favorite deli meats onto the rolls. Start with a generous layer of salami, followed by ham and pepperoni, giving you that incredible Italian flavor. Next, place slices of provolone or mozzarella cheese on top of the meats, ensuring every bite is packed with cheesy goodness.
Step 4: Make the Herb Butter Topping
In a small saucepan, melt about half a cup of butter over low heat. Once melted, stir in Italian herbs and garlic powder until well combined. The fragrant aroma will elevate your Hot Italian Sub Sliders! With a brush or spoon, generously apply this herb-infused butter mixture to the top halves of the slider rolls before placing them back on the baking sheet.
Step 5: Assemble and Bake
Carefully place the top halves of the slider rolls onto the layered bottoms, completing each slider. Pop the baking sheet into your preheated oven and bake for about 15-20 minutes. Keep an eye on them as they bake—look for that bubbling cheese and golden brown crust, indicating they’re ready to come out.
Step 6: Cool and Serve
Once your Hot Italian Sub Sliders are perfectly baked, remove them from the oven and let them cool slightly for about five minutes. This brief rest allows the flavors to meld beautifully. After cooling, slice through each slider to serve, and watch as everyone digs into these delightful treats!

Storage Tips for Hot Italian Sub Sliders
-
Fridge: Store leftover sliders in an airtight container for up to 3 days to maintain freshness. Reheat them at 300°F (150°C) for about 10 minutes to restore that gooey texture.
-
Freezer: For longer storage, wrap individual sliders tightly in plastic wrap or aluminum foil, then place them in a freezer-safe bag. They can be frozen for up to 2 months.
-
Reheating: When ready to enjoy your frozen Hot Italian Sub Sliders, remove them from the freezer and allow them to thaw in the fridge overnight, then reheat as per fridge instructions.
-
Avoid Sogginess: To keep sliders from getting soggy, avoid stacking them when storing. Each slider should have some space around it to stay fresh longer.
What to Serve with Hot Italian Sub Sliders
Add a scrumptious side to your sliders that will delight your taste buds and complete the meal experience.
- Crispy Potato Wedges: Perfectly seasoned, these crispy bites complement the savory sliders and are easy to dip in your favorite sauces.
- Creamy Coleslaw: This cool, crunchy side adds a refreshing balance to the rich flavors of the sliders, enhancing each bite beautifully.
- Garlic Breadsticks: These warm, buttery breadsticks are the ideal companion, perfect for soaking up any extra cheese or sauce from your sliders.
- Italian Garden Salad: A fresh mix of greens, herbs, and tomatoes vibrantly contrasts the hearty sliders, keeping the meal light and zesty.
- Garlic Parmesan Fries: Golden, crispy fries dusted with garlic and parmesan offer a deliciously indulgent experience alongside the sliders.
- Tortellini Pasta Salad: Packed with flavors, this pasta salad can be customized to your liking, making it a delightful side that resonates with Italian cuisine.
- Soda Floats: For a fun twist, serve nostalgic soda floats that bring a sense of joy and sweetness, rounding off your meal perfectly.
- Zesty Lemonade: Quench your thirst with this refreshing drink that provides a sweet and tangy contrast to the rich flavors of the sliders.
Expert Tips for Hot Italian Sub Sliders
-
Choose the Right Roll: Opt for soft sub rolls or slider buns to prevent sogginess and ensure easy handling. Steer clear of crusty breads!
-
Avoid Overstuffing: Keep your layers balanced; too many meats or cheeses can lead to difficult-to-eat sliders. Moderation is key for a perfect bite!
-
Customize with Care: While variations are fun, remember to balance flavors and textures. Try to mix complimentary meats and cheeses for the best Hot Italian Sub Sliders.
-
Herbed Butter Blend: For an extra flavor boost, mix in fresh herbs with the melted butter. This elevates the aroma and taste, making sliders irresistibly delicious!
-
Bake Just Right: Monitor the sliders closely while baking to avoid overcooking. They should be golden brown and bubbly—nothing less!
Make Ahead Options
These Hot Italian Sub Sliders are perfect for meal prep enthusiasts looking to save time without sacrificing flavor! You can assemble the sliders up to 24 hours in advance: simply layer the deli meats and cheese on the bottom halves of the rolls, then keep them covered in the refrigerator. When you’re ready to bake, brush the tops with the herb-infused butter and bake as instructed, adding a few extra minutes if the sliders have been refrigerated. This method ensures that they remain just as delicious, with a crispy top and gooey interior. Enjoy your busy weeknights with this simple prep strategy!
Hot Italian Sub Sliders Variations
Get ready to personalize your sliders with delightful twists that will tantalize your taste buds!
-
Turkey Alternative: Substitute deli meats with turkey slices for a lighter option that still packs a punch in flavor.
You can enjoy the same buttery crust alongside healthier ingredients! -
Vegetarian Delight: Swap out meats for grilled vegetables like zucchini and bell peppers for a fresh, vibrant take.
This twist not only adds color but also offers a lovely texture, perfect for veggie lovers. -
Cheese Choice: Experiment with different melting cheeses, such as cheddar or gouda, for varied flavor profiles.
These cheeses will add richness, changing the character of your sliders in a delicious way! -
Spicy Kick: Introduce jalapeños or crushed red pepper for a fiery touch that elevates the sliders’ flavor.
The added heat will create a delightful contrast to the buttery topping and melty cheese! -
Herbed Butter: Infuse your butter with fresh herbs like rosemary or thyme for an aromatic twist.
This subtle change will enhance the flavor, giving your sliders a gourmet touch everyone will love. -
Sweet Drizzle: Add a balsamic glaze on top before serving to introduce a sweet, tangy element.
It complements the savory sliders beautifully, creating a well-rounded taste sensation! -
Mediterranean Twist: Incorporate sliced olives or feta cheese for a burst of Mediterranean flavor.
This variation brings a unique taste experience that will keep your guests coming back for more!
For even more ideas, why not try these sliders alongside a refreshing garden salad or some crispy potato wedges? You’ll have a satisfying meal that’s sure to impress. Plus, if you’re in the mood for something sweet afterward, check out my Strawberry Swirl Cheesecake for dessert!
Hot Italian Sub Sliders Recipe FAQs
What kind of slider rolls should I use?
Absolutely! Soft sub rolls or slider buns are ideal because they hold the fillings well without becoming too soggy. If you can’t find those, any soft bread would work as a good alternative, but steer clear of crusty options!
How should I store leftover Hot Italian Sub Sliders?
Very well! After you’ve enjoyed your sliders, store any leftovers in an airtight container in the refrigerator for up to 3 days. To reheat, simply place them in a preheated oven at 300°F (150°C) for about 10 minutes. This method will help you retain the delicious, gooey interior for a delightful second serving!
Can I freeze Hot Italian Sub Sliders?
Definitely! To freeze, wrap each slider individually in plastic wrap or aluminum foil and place them in a freezer-safe bag. They can last up to 2 months in the freezer. When you’re ready to enjoy, thaw them in the fridge overnight before reheating them to enjoy warm and melty goodness.
What if my sliders come out soggy?
Don’t worry! Soggy sliders can be avoided by ensuring you’re using soft rolls that aren’t too crusty. Additionally, make sure not to pile on too many toppings, as this can lead to excess moisture. If you suspect they may be a bit soggy, toast the rolls lightly before assembly to create a barrier.
Are there any dietary considerations for Hot Italian Sub Sliders?
Great question! If you’re catering to guests with dietary restrictions, consider using gluten-free slider buns or opting for a vegetarian version by replacing the deli meats with grilled veggies. Always check the labels on deli meats and cheeses to ensure they don’t contain allergens if you’re serving guests with food sensitivities.
How do I customize my Hot Italian Sub Sliders?
The more the merrier! You can mix and match various deli meats such as turkey, roast beef, or grilled vegetables for a vegetarian spin. When it comes to cheese, try swapping provolone or mozzarella for your favorite melting cheese like cheddar or gouda. Don’t forget to toss in extras like jalapeños for spice, or a drizzle of balsamic glaze for a sweet contrast!
Irresistible Hot Italian Sub Sliders Recipe for Every Occasion
Ingredients
Equipment
Method
- Preheat your oven to 350°F (175°C) to prepare for baking.
- Cut the slider rolls in half horizontally and place the bottom halves on a baking sheet lined with parchment paper.
- Layer the deli meats onto the rolls followed by cheese slices.
- Melt butter in a small saucepan, stir in herbs and garlic powder, and brush over the top halves of the rolls.
- Assemble the sliders by placing the top halves onto the layered bottoms and bake for 15-20 minutes.
- Let the sliders cool slightly before slicing and serving.
Leave a Reply