
As Halloween approaches, the excitement in the air becomes almost palpable—there’s something magical about transforming ordinary gatherings into unforgettable festive experiences. Enter my Cheesy Witch Hat Snack Board, a playful and creamy appetizer that’s bound to be the star of your Halloween celebrations. Not only is this dish easy to prepare, allowing you more time to enjoy the evening, but it also provides a delightful blend of textures with its smooth cheese and crunchy vegetables. Plus, its spook-tacular presentation will have your friends raving! Are you ready to conjure up this unforgettable treat that will elevate your Halloween party? Let’s dive into the deliciousness!
Why Is This Witch Hat Snack Board Perfect?
Simplicity: With just a few ingredients, this Cheesy Witch Hat Snack Board comes together quickly, leaving you more time for Halloween fun!
Spook-tacular Presentation: Shaped like a witch’s hat, it’s a showstopper that will impress and delight your guests, making it a perfect centerpiece for your party.
Creamy Deliciousness: The combination of cream cheese, cheddar, and herbs creates a rich and flavorful spread that pairs beautifully with crunchy veggies and crackers.
Crowd-Pleaser: Whether you’re hosting a small gathering or a large bash, this snack board will appeal to both kids and adults—everyone loves cheese!
Versatile: Customize this board with your favorite toppings or swap the cheese for a mix of mozzarella and parmesan for different flavors. For more delightful ideas, check out these Beef Manhattan Savor and Cherry Cheesecake Bites recipes to round out your Halloween feast.
Witch Hat Snack Board Ingredients
For the Cheese Mixture
- Cream Cheese – Ensure it’s softened for easy mixing, creating a creamy base for the spread.
- Land O’ Lakes® Butter – Adds richness and smoothness; regular soft butter works best for the desired texture.
- Dry Italian Salad Dressing Mix – Imparts zesty flavor; you can substitute with homemade Italian herbs for a personal touch.
- Shredded Cheddar Cheese – This is key for flavor; opt for mild cheddar if you prefer a less intense taste.
- Chopped Pimentos – Adds color and a hint of sweetness; regular diced red bell pepper is a great alternative if necessary.
For the Decoration
- Poppy Seeds – These provide aesthetic appeal, but feel free to use sesame seeds for a crunchy alternative.
- Carrot – Use this for the decorative band of the hat; thin slices from any bright vegetable can add a fun touch.
This Witch Hat Snack Board is not only a visual treat but also a delicious way to celebrate Halloween with family and friends!
Step‑by‑Step Instructions for Witch Hat Snack Board
Step 1: Prepare the Cheese Mixture
In a large mixing bowl, combine the softened cream cheese, Land O’ Lakes® butter, dry Italian salad dressing mix, shredded cheddar cheese, and chopped pimentos. With a hand mixer, beat the mixture on medium speed until fully creamy and well-blended, about 2-3 minutes. Make sure there are no lumps for a smooth texture, setting the stage for your delightful Witch Hat Snack Board.
Step 2: Reserve and Refrigerate
Scoop out 2 tablespoons of the creamy cheese mixture into a small bowl and set it aside for later. Cover the bowl with plastic wrap and refrigerate it. This reserved mixture will help attach the hatband later. Meanwhile, wrap the remaining cheese mixture in plastic wrap and chill it in the refrigerator for about 30 minutes to firm up, making it easier to shape.
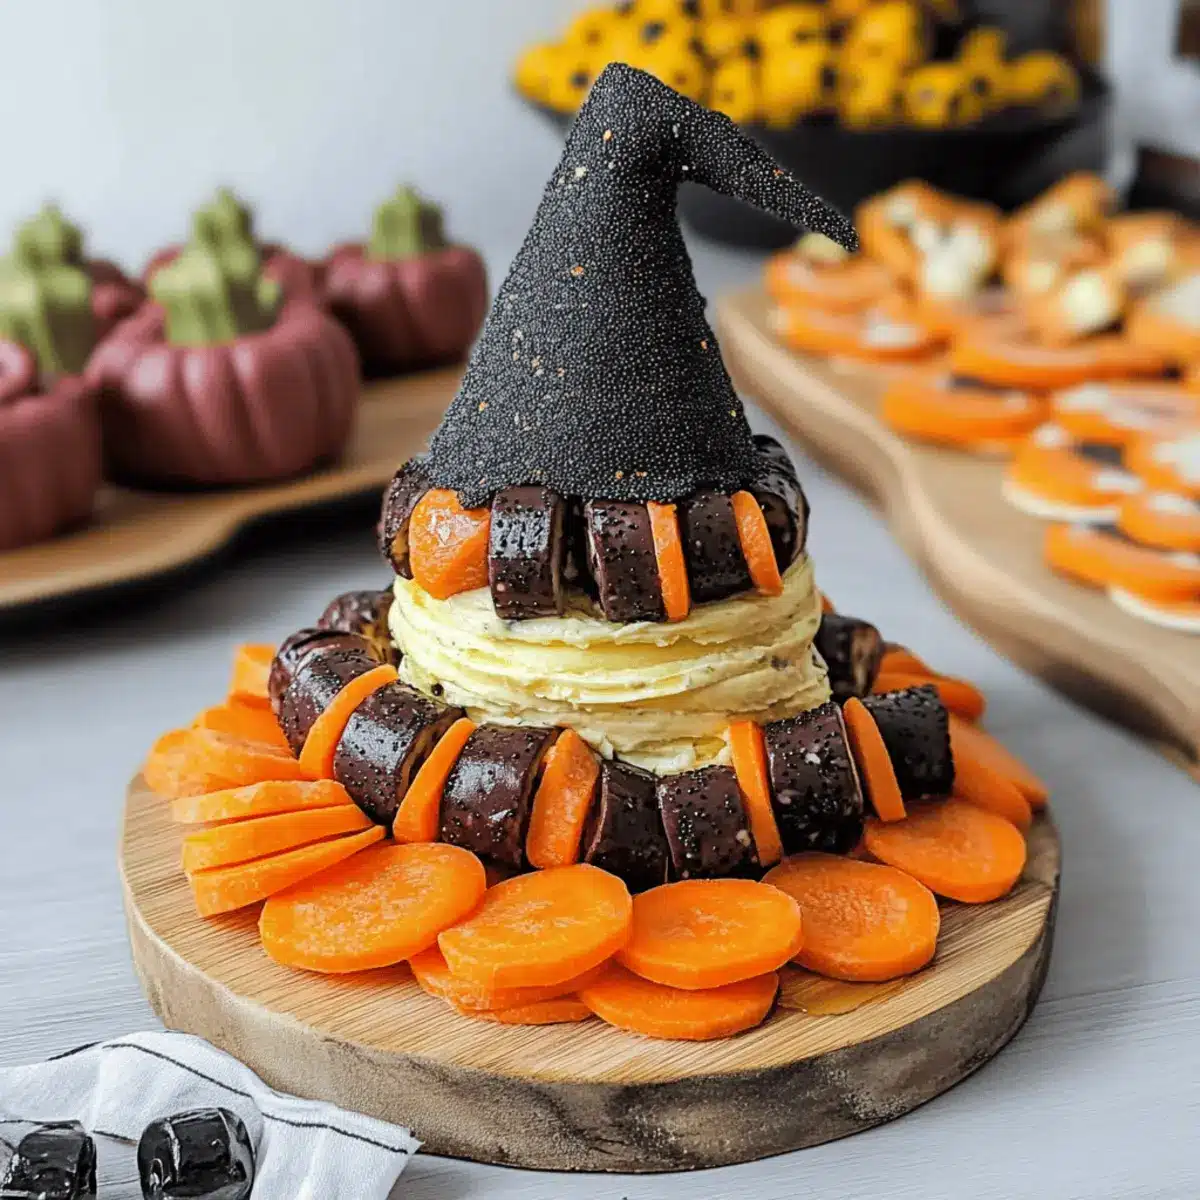
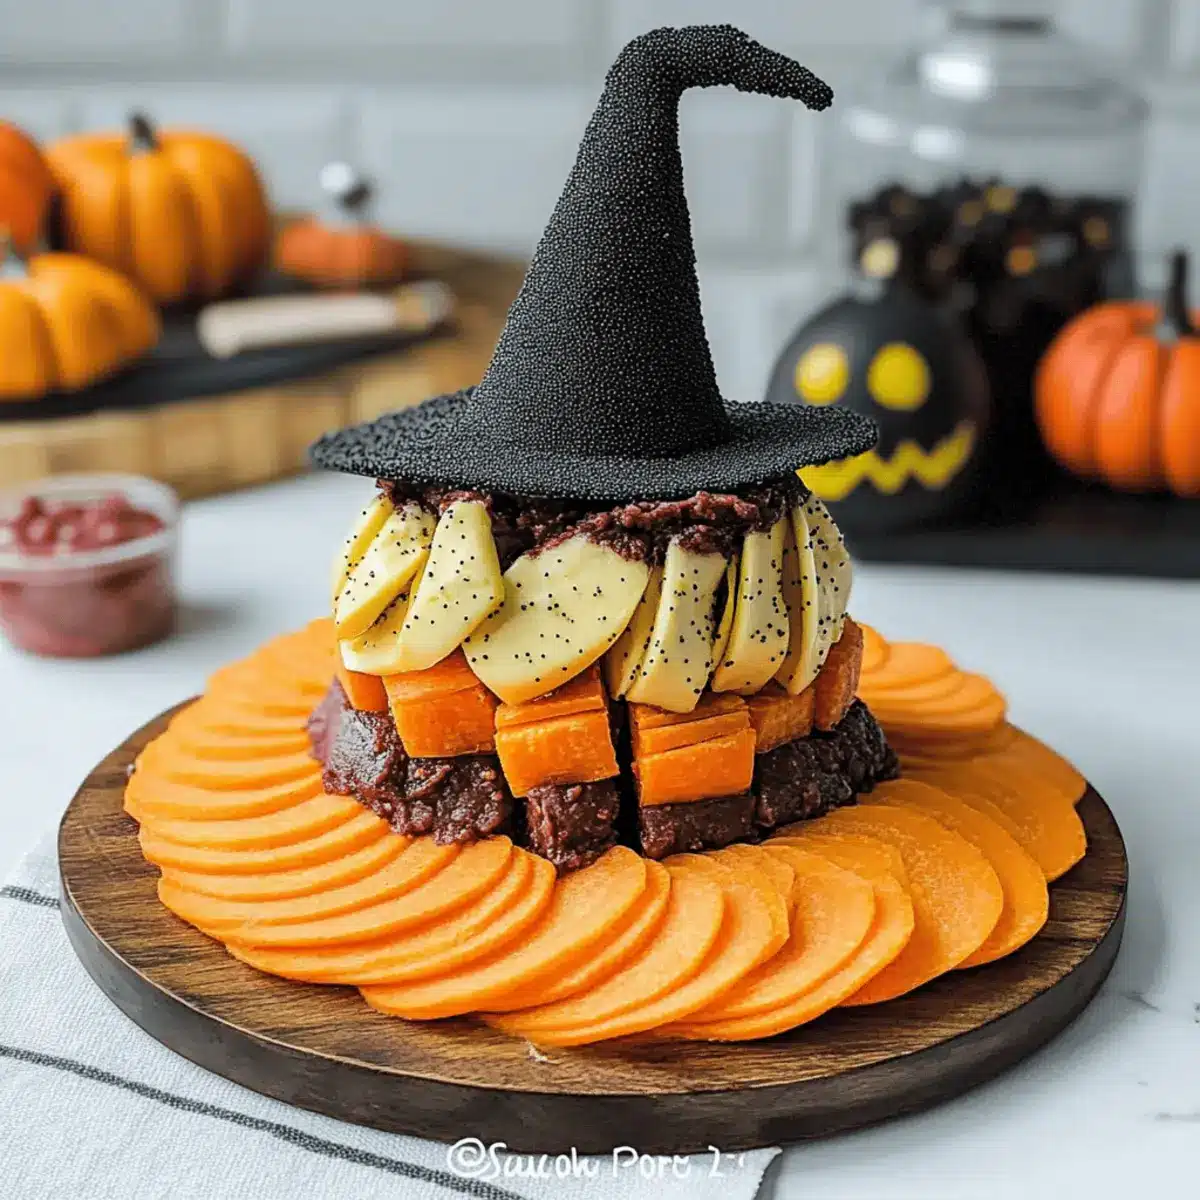
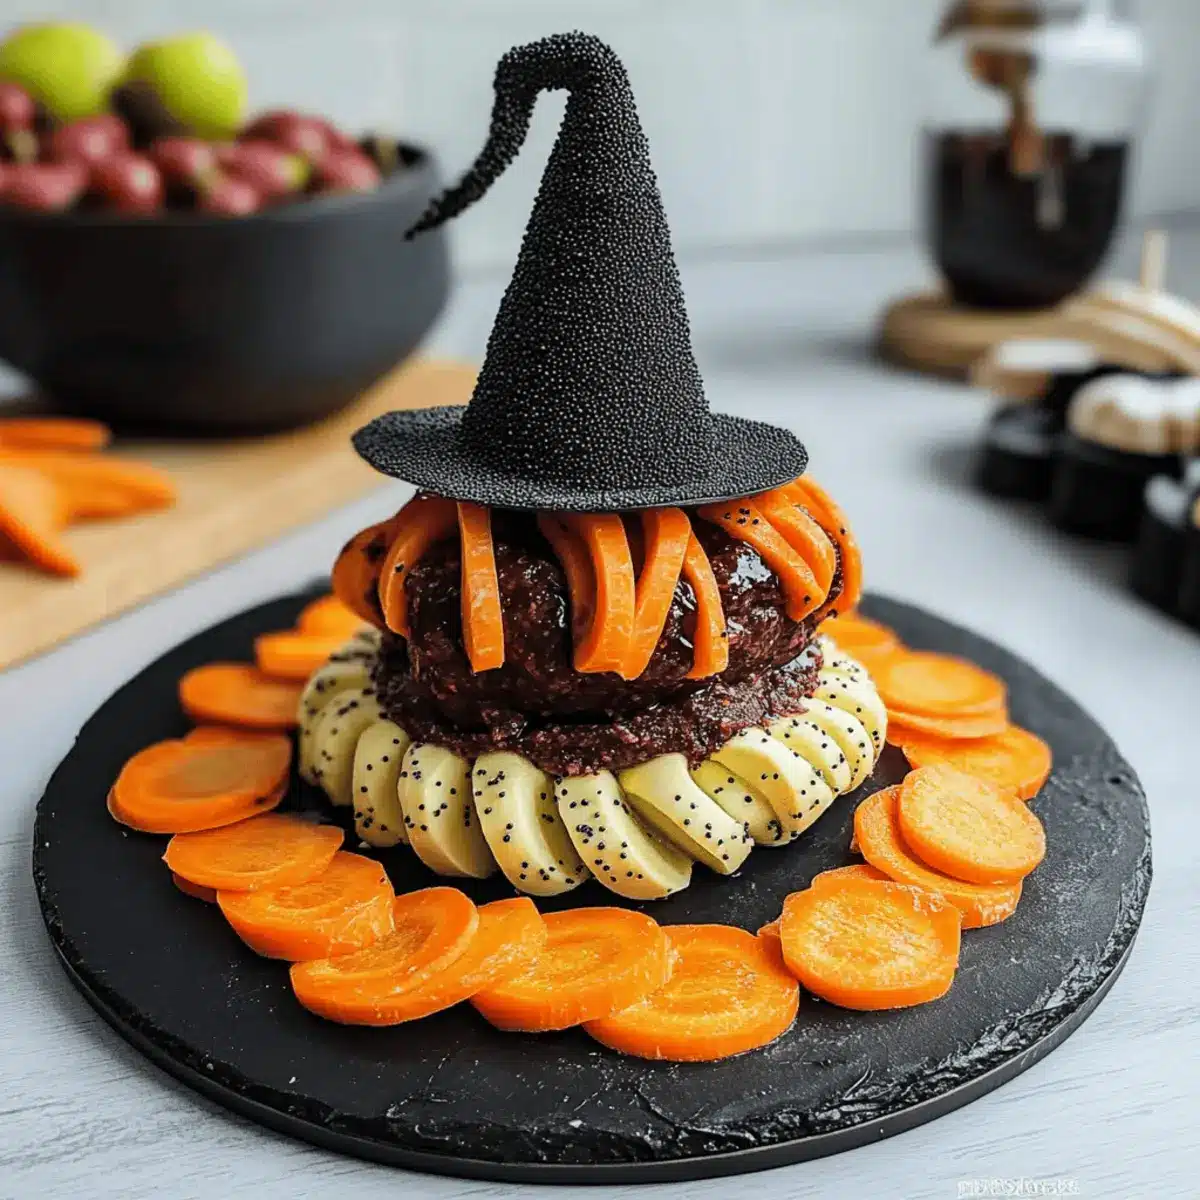
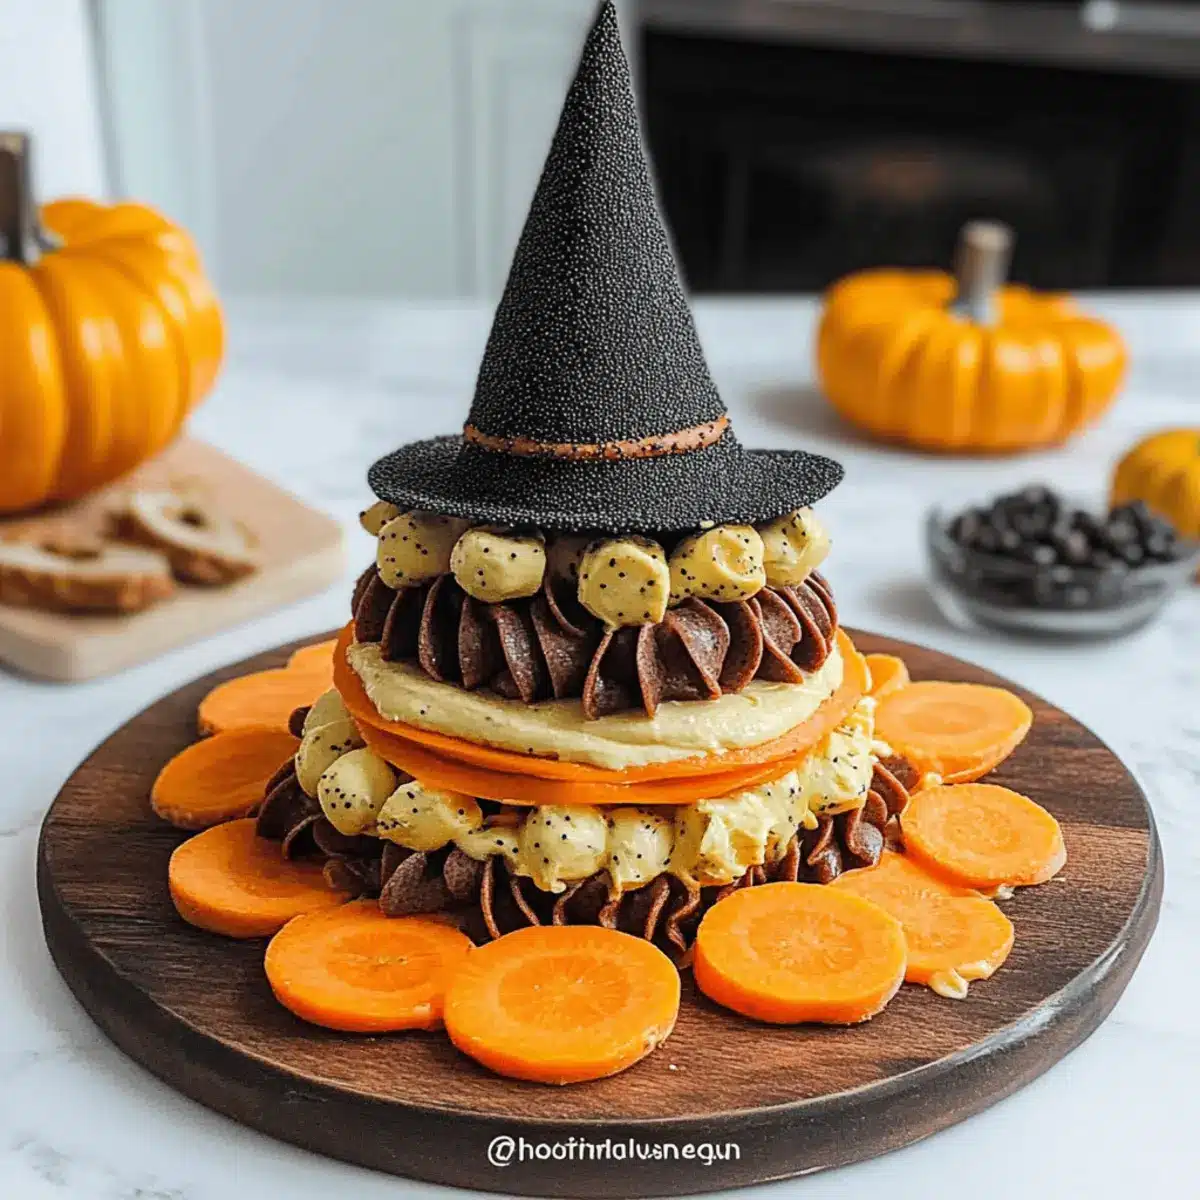
Step 3: Form the Hat Brim
On a flat serving plate, unroll the wrap from half of the cheese mixture and spread it into a 6-inch circle, forming the brim of your witch hat. Smooth the surface with a spatula, ensuring it creates a stable base. Visualize the structure as you work, keeping it thick enough for a solid foundation for your Witch Hat Snack Board.
Step 4: Shape the Hat Top
Take the other half of the chilled cheese mixture and form it into a 4-inch ball using your hands. Wrap the ball in plastic wrap and return it to the refrigerator alongside the brim. Let it rest for at least 30 minutes to an hour, which helps it firm up further and will allow for easier assembly of your witch hat shape.
Step 5: Assemble the Hat
Once chilled, carefully lift the ball from the refrigerator and place it on top of the brim. Using your hands, shape the ball into a cone to resemble the top of the witch hat. Press the two components firmly together, ensuring they adhere well as you create the focal point of your Witch Hat Snack Board that will wow your guests.
Step 6: Decorate with Poppy Seeds
Sprinkle the entire surface of the shaped hat with poppy seeds, pressing them gently into the cheese mixture to create a festive, witchy appearance. Ensure that the cheese is covered evenly to enhance the visual appeal of your snack board. The poppy seeds add both texture and an artisan look to your creation.
Step 7: Add the Hatband
Retrieve the reserved cheese mixture from the refrigerator. Use it to attach thin slices of carrot around the base of the hat, forming a decorative band. Gently press the carrot slices into the cheese to keep them in place. This step not only adds color but also finishes the whimsical look of your Witch Hat Snack Board beautifully.
Step 8: Final Chill and Serve
Cover the assembled witch hat loosely with plastic wrap and refrigerate it for at least 2 hours, allowing the flavors to meld and the hat to set firmly. When ready to serve, arrange assorted crackers and fresh vegetables around the hat on the platter. This delightful presentation is now ready to charm your guests and add festive cheer to your Halloween celebration!
How to Store and Freeze Witch Hat Snack Board
Fridge: Keep the assembled Witch Hat Snack Board covered in the refrigerator for up to 3 days. This ensures maximum freshness and flavor for your creamy cheese spread.
Freezer: For longer storage, you can freeze the cheese mixture (before assembly) for up to 2 months. Thaw it in the refrigerator overnight and then shape it into the witch hat before serving.
Reheating: There’s no need to reheat this appetizer; serve it chilled to maintain the delightful textures and flavors that make your Witch Hat Snack Board a treat.
Covering: Always use plastic wrap or an airtight container to cover the snack board to prevent it from absorbing any odors or flavors from the fridge.
Expert Tips for Witch Hat Snack Board
• Use Room Temperature Ingredients: Make sure your cream cheese and butter are at room temperature. This ensures a smooth, lump-free mixture for your witch hat snack board, enhancing its creamy texture.
• Chill Properly: Allow the cheese mixture to chill adequately before shaping. This step helps maintain the structure of your witch hat, making it much easier to assemble without it collapsing.
• Creative Decorations: Feel free to get creative with your hatband! Instead of just carrot slices, try using colorful bell peppers or cucumbers for a festive flair that pops on your plate.
• Tasting Adjustments: Don’t hesitate to adjust seasoning! Taste the cheese mixture before assembling; a little extra dressing can increase the flavor punch in your witch hat snack board.
• Make-ahead Option: This appetizer can be prepared a day in advance. Assemble the hat the night before and add the crackers and veggies right before serving for optimal freshness.
• Serving Suggestions: Pair the witch hat with a variety of dippable items like pretzel crisps, breadsticks, or even apple slices for an unexpected sweet contrast.
Make Ahead Options
These Cheesy Witch Hats are perfect for meal prep and can save you valuable time as Halloween approaches! You can prepare the cheese mixture and shape the hat up to 24 hours in advance, keeping everything covered in the refrigerator. To maintain quality, ensure the cream cheese is well-softened before mixing and wrap the formed hat tightly in plastic wrap to prevent drying out. When you’re ready to impress your guests, simply follow the finishing steps by attaching the carrot hatband with the reserved cheese mixture and chilling for at least 2 hours before serving, ensuring the flavors meld beautifully while minimizing your workload. Enjoy a delightful appetizer with minimal last-minute effort!
Witch Hat Snack Board Variations
Feel free to sprinkle your own magic onto this chef-worthy creation with these fun and easy variations!
- Cheese Swap: Replace cheddar cheese with a blend of mozzarella and parmesan for a milder flavor that’s creamy and delightful.
- Spicy Kick: Use a spicy Italian dressing mix to elevate the cheese spread with a bit of heat, perfect for those who love a zesty twist.
- Crunchy Topping: Consider switching poppy seeds for crushed tortilla chips for added crunch and a festive flair.
- Colorful Veggies: Use colorful bell peppers or cucumbers instead of carrots to create a vibrant hatband that will dazzle your guests.
- Herbal Infusion: Add fresh herbs like chives or parsley to the cheese mixture for a delightful burst of flavor that complements the creamy texture.
- Vegetarian Twist: Replace the pimentos with finely chopped olives for a savory and briny twist that pairs beautifully with the cheese.
- Mini Hats: Create bite-sized mini witch hats by shaping smaller portions for a fun interactive appetizer that’s perfect for kids.
- Sweet Fare: Add a hint of sweetness by mixing in some dried cranberries for a deliciously unexpected flavor contrast.
These variations could enchant your Halloween spread! For more delightful bites to complement your celebration, consider whipping up some Beef Manhattan Hearty or finish with sweet bites like Cherry Cheesecake Bites. Happy cooking!
What to Serve with Cheesy Witch Hat
Imagine delighting your party guests with a vibrant spread that perfectly complements the creamy, whimsical charm of this Halloween treat!
- Crunchy Veggie Platter: Fresh bell peppers, cucumbers, and carrots add a refreshing contrast to the rich cheese, enhancing every bite.
- Assorted Crackers: A variety of crunchy crackers provides the perfect vehicle for scooping up the creamy cheese, ensuring a satisfying texture.
- Spooky Fruit Skewers: Create fun skewers with grapes and orange slices to add a sweet balance to the savory flavors on your board.
- Savory Mini Quiches: Their fluffy texture and rich filling complement the cheese beautifully, plus they make for an indulgent addition to your spread.
- Pumpkin Spice Dip: This sweet dip brings in seasonal spices, offering a delightful contrast with your witch hat’s creamy richness, making it a unique pairing.
- Chilled White Wine: A crisp Sauvignon Blanc or Pinot Grigio enhances the creamy cheese’s flavors while providing a refreshing palate cleanser.
- Cider Cocktails: Sparkling apple cider served in festive glasses adds a bubbly touch to your Halloween celebration, perfectly harmonizing with the cheese flavors.
- Halloween-themed Desserts: Incorporate spooky cupcakes or sugar cookies decorated to match the season, creating a fun, festive atmosphere that rounds out the meal beautifully.
Witch Hat Snack Board Recipe FAQs
What kind of cream cheese should I use for the Witch Hat Snack Board?
Absolutely! For the best results, make sure to use full-fat cream cheese that is completely softened. This ensures easy mixing and the smoothest texture for your cheesy mixture, making your Witch Hat Snack Board a creamy delight!
How long can I store the assembled Witch Hat Snack Board in the fridge?
You can keep the assembled Witch Hat Snack Board covered in the refrigerator for up to 3 days. Just be sure it’s properly wrapped to maintain its freshness and flavor, as the cream cheese spread can dry out or absorb flavors from the fridge.
Can I freeze the cheese mixture for the Witch Hat Snack Board?
Yes! You can freeze the cheese mixture (prior to assembling the hat) for up to 2 months. To freeze, scoop the mixture into an airtight container and label it. When you’re ready to use it, thaw it overnight in the refrigerator before shaping and assembling your hat board.
What should I do if the cheese mixture is too thick to spread?
If your cheese mixture becomes too thick, don’t worry! Just add a splash of milk or a little more softened cream cheese to loosen it. Mix it well until you reach your desired consistency. Remember, the mixture should be creamy enough to spread easily without any lumps!
Can I use different toppings for the Witch Hat Snack Board?
Very! Feel free to get creative! You can use crushed tortilla chips for a crunchy texture or colorful bell peppers for the hatband instead of carrots. Mixing it up not only enhances visual appeal but adds exciting flavors to your spooky treat.
Is this recipe suitable for those with allergies?
For sure! This recipe primarily contains dairy ingredients. If you have dairy allergies, you could experiment with dairy-free cream cheese and butter alternatives. Always check the labels for hidden allergens and make substitutions that meet your dietary needs.
Witch Hat Snack Board: A Spooky Treat for Halloween Fun
Ingredients
Equipment
Method
- In a large mixing bowl, combine softened cream cheese, butter, dry Italian salad dressing mix, shredded cheddar cheese, and chopped pimentos. Beat the mixture on medium speed until creamy, about 2-3 minutes.
- Scoop out 2 tablespoons of the cheese mixture into a small bowl and refrigerate. Wrap the remaining cheese mixture in plastic wrap and chill for 30 minutes.
- On a flat serving plate, spread half of the chilled cheese mixture into a 6-inch circle for the brim.
- Form the other half into a 4-inch ball, wrap it in plastic wrap, and chill for 30 minutes to an hour.
- Carefully lift the ball and place it on top of the brim, shaping it into a cone.
- Sprinkle the hat with poppy seeds, pressing them gently into the cheese mixture.
- Use the reserved cheese mixture to attach slices of carrot around the base for a decorative band.
- Cover loosely with plastic wrap and refrigerate for at least 2 hours before serving.
Leave a Reply