
The scent of peppermint and chocolate wafting from the oven is enough to transport me back to cozy holiday gatherings. These Peppermint Chocolate Thumbprint Cookies are not just an indulgence; they offer a delightful twist to your traditional cookie repertoire. They’re incredibly easy to prepare, making them an ideal choice for busy holiday prep, and with their vibrant design, they’re bound to impress everyone on your festive treat platter. Plus, these cookies are freezer-friendly, giving you the flexibility to whip them up ahead of time, which is a holiday lifesaver! Are you ready to add a bit of magic to your baking this season? Let’s dive into the joy of creating these delicious bites!
Why are these cookies so special?
Festive Flavors: The combination of chocolate and peppermint creates a holiday cheer in every bite, perfect for gatherings.
Easy-Breezy Preparation: This recipe is straightforward and requires minimal ingredients, allowing anyone to jump into holiday baking, even if you’re pressed for time.
Freezer-Friendly: Make a big batch and freeze them for later, ensuring you always have a delightful treat ready for unexpected guests—just like these tasty Lemon Oatmeal Cookies.
Versatile Variations: Mix things up with options like Dark Chocolate Delight or Candy Cane Crunch, catering to various preferences and making every batch unique.
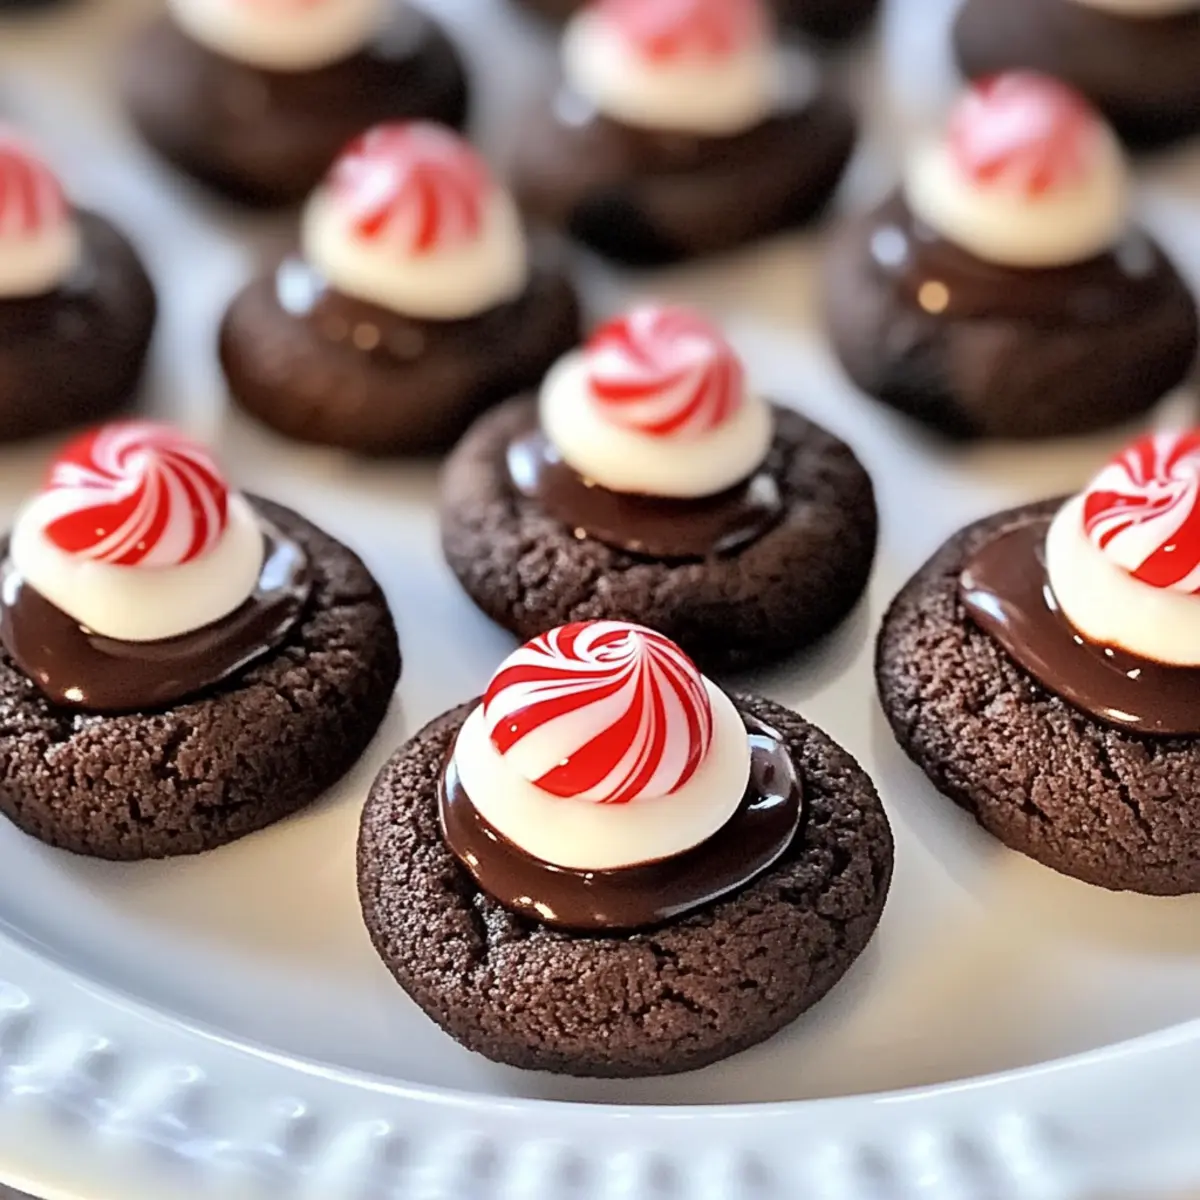
Impressive Presentation: Topped with a melty peppermint kiss, these cookies not only taste great but also look beautiful on any festive platter, guaranteeing you compliments from friends and family!
Peppermint Chocolate Thumbprint Cookies Ingredients
• Here’s everything you need to create these festive delights!
For the Cookie Dough
- Unsalted Butter – Provides richness and moisture; use softened butter for easy mixing.
- Granulated Sugar – Sweetens the dough; can be swapped with coconut sugar for a less refined option.
- Light Brown Sugar – Adds depth and chewiness; regular brown sugar works as a substitute.
- Egg Yolks – Contributes to a tender texture; ensure they’re at room temperature for optimal mixing.
- Vanilla Extract – Enhances the flavor profile; substitute with peppermint extract for a stronger minty taste, but reduce to ¾ teaspoon.
- All-Purpose Flour – Forms the structure of the cookie; substitute with a gluten-free blend if needed.
- Unsweetened Baking Cocoa – Delivers the rich chocolate flavor; use high-quality cocoa for the best results.
- Fine Sea Salt – Balances sweetness and enhances flavors; essential for a well-rounded taste.
- Baking Powder & Baking Soda – Acts as leavening agents; ensure they are fresh for effective results.
For the Topping
- Frozen Peppermint Kisses – The signature topping; must be well-frozen to hold shape during baking.
Step‑by‑Step Instructions for Peppermint Chocolate Thumbprint Cookies
Step 1: Prepare Kisses
Begin by freezing your peppermint kisses for at least 2 hours. This step is crucial; having them frozen will ensure they maintain their shape when pressed into the cookies later on. Use a baking sheet or plate to lay the kisses flat, preventing them from sticking together during the freezing process.
Step 2: Mix Wet Ingredients
In a large mixing bowl, cream together 1 cup of softened unsalted butter, ½ cup granulated sugar, and ½ cup light brown sugar using an electric mixer. Beat on medium speed until the mixture is light and fluffy, about 2-3 minutes. Next, add in 2 room temperature egg yolks and 1 teaspoon of vanilla extract, mixing until everything is well combined and smooth.
Step 3: Combine Dry Ingredients
In a separate bowl, whisk together 1 ¾ cups of all-purpose flour, ½ cup unsweetened cocoa powder, ½ teaspoon fine sea salt, ½ teaspoon baking powder, and ½ teaspoon baking soda. Once evenly mixed, gradually incorporate the dry ingredients into the wet mixture using a spatula. Stir until there are no dry spots, and the dough is smooth and cohesive.
Step 4: Chill Dough
To achieve the perfect texture for your Peppermint Chocolate Thumbprint Cookies, cover the dough with plastic wrap and refrigerate for at least 3 hours, or overnight if you can. This chilling time helps prevent spreading during baking, ensuring your cookies maintain their shape and develop the right consistency.
Step 5: Form and Bake Cookies
Preheat your oven to 350°F (175°C). Once the dough is chilled, scoop out portions and roll them into 1-inch balls. Place the balls onto a parchment-lined baking sheet, spacing them about 2 inches apart. Bake for 7-8 minutes, until the edges are set, but the centers still look slightly soft and underbaked for that perfect chewy texture.
Step 6: Add Kisses
As soon as you remove the cookies from the oven, press a frozen peppermint kiss into the center of each warm cookie. The heat from the cookie will begin to melt the kiss, creating a gooey, delightful topping. Allow the cookies to rest on the baking sheet for about 5 minutes to let the kisses soften slightly.
Step 7: Cool Completely
Carefully transfer the cookies to wire racks and let them cool completely. This cooling time allows the cookies to finish setting while ensuring that the peppermint kisses melt just enough to create a delicious topping. Enjoy the festive aroma as your Peppermint Chocolate Thumbprint Cookies cool and wait for their delicious fate!

What to Serve with Peppermint Chocolate Thumbprint Cookies
Indulging in these festive treats is a joy, but pairing them with the right sides elevates the experience even further.
-
Rich Hot Chocolate: A warm cup of rich hot chocolate enhances the peppermint notes while providing a delightful, cozy beverage for winter gatherings.
-
Festive Fruit Salad: A mix of seasonal fruits like oranges, pomegranate, and kiwi adds a refreshing sweetness, balancing the rich chocolate and peppermint flavors.
-
Creamy Eggnog: The smooth, spiced flavor of eggnog complements the sweetness of the cookies, making it a classic pairing for holiday celebrations.
-
Crunchy Sugar Cookies: Serve alongside classic sugar cookies for a delightful texture contrast, providing a simple sweetness that complements the peppermint chocolate.
-
Minty Peppermint Bark: Layering these cookies with peppermint bark creates a festive dessert ensemble that showcases the flavors of the season beautifully.
-
Coffee or Espresso: A cup of freshly brewed coffee or a shot of espresso brings out the richness in the cookies, making it a perfect match for afternoon treats.
-
Vanilla Ice Cream: A scoop of creamy vanilla ice cream pairs wonderfully with warm cookies, balancing the richness with its cool, smooth texture and mild flavor.
-
Holiday Punch: A sparkling holiday punch, with citrus and spice notes, brightens up the table and pairs well with the sweet, minty essence of the cookies.
Expert Tips for Perfect Peppermint Chocolate Thumbprint Cookies
-
Chill for Success: Always chill the cookie dough for at least 3 hours. This step is essential for preventing the cookies from spreading too much during baking.
-
Frozen Kisses are Key: Ensure your peppermint kisses are well-frozen before adding them to the cookies. This helps them maintain their shape and texture while baking.
-
Small Test Batch: If you’re unsure about your oven’s baking time, bake a small batch first. Different ovens can produce varied results, so testing is a great way to avoid surprises.
-
Flavor Enhancements: For a stronger peppermint flavor, feel free to add crushed candy canes to the dough. This not only intensifies the taste but also adds a festive crunch!
-
Add Spice or Nuts: Don’t be afraid to experiment! Incorporating a pinch of cayenne pepper offers a delightful spicy twist, while chopped nuts provide a lovely texture variation. Enjoy your Peppermint Chocolate Thumbprint Cookies with extra layers of flavor!
How to Store and Freeze Peppermint Chocolate Thumbprint Cookies
Room Temperature: Keep cookies in an airtight container at room temperature for up to 3 days for the freshest taste and texture.
Fridge: For longer storage, place cookies in an airtight container in the fridge for up to 1 week. Be sure to layer them with parchment paper to prevent sticking.
Freezer: Freeze cookies in a single layer in a freezer-safe container or bag for up to 6 weeks. Thaw them at room temperature before serving for the best flavor.
Reheating: If you prefer warm cookies, reheat them in the microwave for about 10-15 seconds, or pop them in a preheated oven at 350°F (175°C) for a few minutes until warm.
Make Ahead Options
These Peppermint Chocolate Thumbprint Cookies are perfect for busy home cooks looking to streamline their holiday baking! You can prepare the cookie dough up to 24 hours in advance by chilling it in the fridge, wrapped tightly in plastic wrap to maintain freshness. You can also freeze the formed cookie balls for up to 3 months—just ensure they are spaced out on a baking sheet before transferring them to a freezer bag. When you’re ready to bake, there’s no need to thaw; simply bake the dough straight from the freezer and press the frozen peppermint kisses onto the warm cookies. This way, you’ll have festive, warm cookies with minimal effort, just in time for your holiday gatherings!
Peppermint Chocolate Thumbprint Cookies Variations
Feel free to let your creativity shine with these delightful twists that can transform your cookies into multiple scrumptious treats!
-
Dark Chocolate Delight: Swap peppermint kisses for dark chocolate kisses for a more intense flavor. This deeper chocolate version makes each bite feel rich and luxurious—perfect for the dark chocolate lovers in your life!
-
Candy Cane Crunch: Add crushed candy canes to the dough for a festive crunch. Not only do they look beautiful, but the added texture brings a delightful snap that complements the softness of the cookie beautifully.
-
Frosted Fun: Top your cookies with peppermint frosting for an added layer of sweetness. The creamy frosting enhances the cookies’ festive flavor and gives them a beautifully decorated finish that’s sure to impress your guests.
-
Nutty Addition: Incorporate chopped walnuts or pecans into the dough for a crunchy texture. This variation adds a lovely nuttiness, which balances the sweetness of the chocolate and peppermint harmoniously.
-
Dairy-Free Option: Substitute coconut oil for butter and use dairy-free chocolate kisses for a delightful dairy-free version. Not only is this an inclusive twist, but it also offers a subtle coconut flavor that complements the chocolate nicely.
-
Spicy Twist: Add a pinch of cayenne pepper for a hint of heat that complements the chocolate. This unexpected addition creates a surprising yet delightful kick that will leave everyone wondering about your secret ingredient.
-
Gluten-Free Option: Use gluten-free all-purpose flour to accommodate gluten sensitivities. This ensures that everyone can indulge in these festive treats without compromising on flavor or texture.
For more holiday inspirations, don’t forget to check out these delightful Lemon Oatmeal Cookies and create a stunning holiday dessert table that your family will adore! Have fun baking and enjoy the delicious creations!

Peppermint Chocolate Thumbprint Cookies Recipe FAQs
What kind of peppermint kisses should I use?
Absolutely! For the best results, use Hershey’s Peppermint Kisses as they melt perfectly and provide that delightful minty flavor. Be sure to freeze them for at least two hours prior to baking to achieve the perfect gooey center without losing their shape.
How long can I store these cookies?
You can store your Peppermint Chocolate Thumbprint Cookies in an airtight container at room temperature for up to 3 days. If you’re looking to keep them fresh for longer, they can be refrigerated for up to 1 week. Just remember to layer them with parchment paper to avoid sticking!
Can I freeze the cookies? If so, how?
Yes, these cookies are fantastic for freezing! Place them in a single layer in a freezer-safe container or a zip-top bag. They can be frozen for up to 6 weeks. When you’re ready to enjoy them, simply thaw them at room temperature for the best taste and texture. For a warm treat, you can reheat them in the microwave or an oven, as mentioned above.
What if the dough seems too sticky?
Very! If you find your dough overly sticky after mixing, don’t fret. Simply dust your hands with a little flour when rolling the dough into balls. Chilling the dough for the recommended 3 hours will also help firm it up. If you chill overnight, you can minimize stickiness even further.
Are there any dietary considerations I should keep in mind?
Absolutely! If you’re accommodating dietary restrictions, you can easily make these Peppermint Chocolate Thumbprint Cookies gluten-free by using a gluten-free flour blend. For a dairy-free option, substitute butter with coconut oil and use dairy-free peppermint kisses. Always check labels for allergens, and if you’re baking for pets, remember not to share your finished treats with them as chocolate is toxic to animals!
What’s the secret to preventing my cookies from spreading too much while baking?
Great question! One of the most effective methods is to ensure that you chill your dough for at least 3 hours (or even overnight). This step significantly helps maintain the shape of the cookies during baking. Additionally, setting your oven to the correct temperature and using fresh leavening agents can lead to better results. Always keep an eye on your cookies as they bake to achieve that perfect, chewy texture!

Festive Peppermint Chocolate Thumbprint Cookies to Delight!
Ingredients
Equipment
Method
- Prepare Kisses: Begin by freezing your peppermint kisses for at least 2 hours. Lay them flat on a baking sheet to prevent sticking.
- Mix Wet Ingredients: In a large mixing bowl, cream together the unsalted butter, granulated sugar, and light brown sugar until light and fluffy. Add egg yolks and vanilla, mixing until smooth.
- Combine Dry Ingredients: In another bowl, whisk together all-purpose flour, cocoa powder, fine sea salt, baking powder, and baking soda. Gradually fold dry mixture into the wet mixture until smooth.
- Chill Dough: Cover the dough and refrigerate for at least 3 hours, or overnight if possible, to prevent spreading during baking.
- Form and Bake Cookies: Preheat oven to 350°F (175°C). Scoop dough into 1-inch balls and place on a parchment-lined baking sheet. Bake for 7-8 minutes until edges are set.
- Add Kisses: Press a frozen peppermint kiss into each warm cookie. Let cookies rest on the baking sheet for 5 minutes to soften the kisses.
- Cool Completely: Transfer cookies to wire racks and let them cool completely.
Leave a Reply