
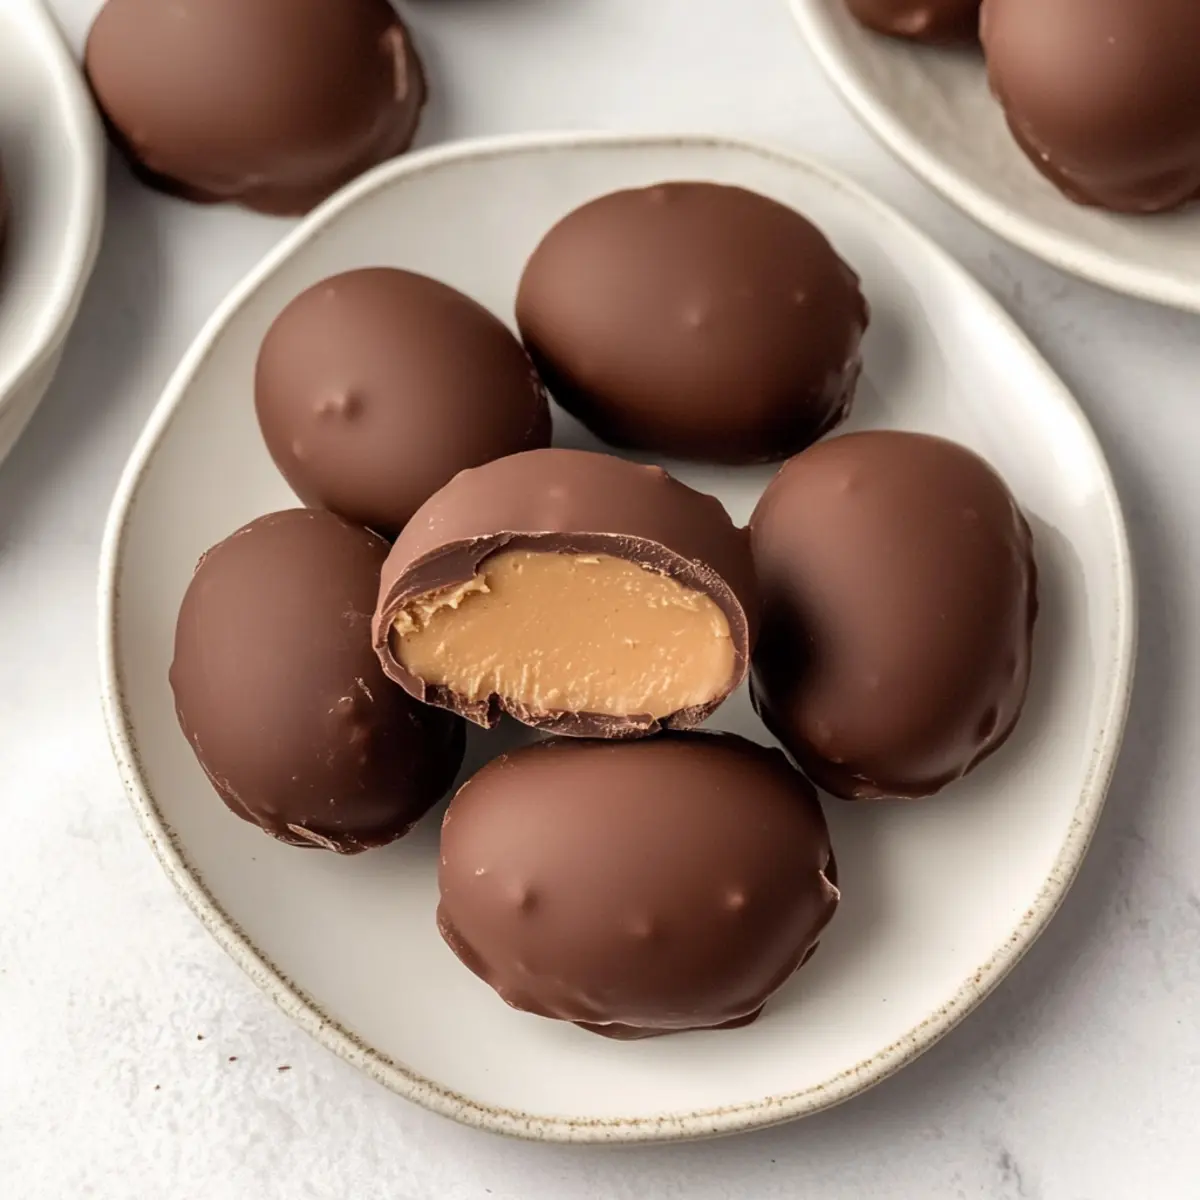
There’s something magical about recreating beloved candies from our childhood. This Homemade Peanut Butter Eggs recipe not only taps into that nostalgia, it takes the joy of Easter treats to a whole new level! These delightful no-bake confections bring together a creamy, sweet peanut butter filling wrapped in a rich chocolate coating, making them perfect for family gatherings or simply indulging in during a quiet moment. The simplicity of this recipe means you’ll have a satisfying homemade treat in no time, without the fuss of baking. Plus, they’re customizable—experiment with vegan options or fun add-ins for a personalized twist. So, are you ready to discover how easy it is to create your own delectable peanut butter eggs at home? Let’s dive in!
Why Make Homemade Peanut Butter Eggs?
Indulgent Flavor: Every bite of these Homemade Peanut Butter Eggs delivers a rich and creamy peanut butter filling, harmonized with a luscious chocolate coating that satisfies any sweet tooth.
No-Bake Simplicity: With no baking required, this recipe is a breeze to whip up, perfect for busy days or last-minute treats.
Customizable Fun: Feel free to switch up the peanut butter for almond or sunflower seed butter, or add in crunchy pretzels for fun texture variations!
Perfect for Any Occasion: Whether it’s Easter or just a sweet craving, these delightful treats are a hit with both kids and adults, making them a fantastic option for gatherings.
Store and Share: Easily prepare them ahead of time—just make sure to stash some away for yourself before sharing! For more sweet delight ideas, check out these Garlic Butter Shrimp or Decadent Brown Butter treats!
Homemade Peanut Butter Eggs Ingredients
For the Filling
- Creamy Peanut Butter – Provides a rich, nutty flavor and creamy texture for the filling; use shelf-stable varieties for best results.
- Unsalted Butter – Adds creaminess and helps bind the filling; can be substituted with coconut oil for a dairy-free option.
- Pure Vanilla Extract – Enhances the flavor profile; opt for pure extract for the most delicious taste.
- Salt – Balances sweetness and enhances overall flavor; can be omitted if you prefer a sweeter filling.
- Powdered Sugar – Adds sweetness and structure; adjust based on your desired sweetness level (1-1.5 cups works great).
For the Coating
- Milk Chocolate Chips – Forms the classic chocolate coating; consider using dark chocolate for a richer flavor or dairy-free chocolate for a vegan alternative.
- Vegetable Shortening – Helps achieve a smooth, glossy chocolate finish; can be replaced with coconut oil for a lighter option.
Enjoy crafting these Homemade Peanut Butter Eggs for an irresistible no-bake treat this Easter!
Step‑by‑Step Instructions for Homemade Peanut Butter Eggs
Step 1: Prepare Filling
Begin by lining a baking sheet with parchment paper to prevent sticking. In a medium saucepan, combine creamy peanut butter and unsalted butter over medium heat. Stir continuously until the mixture is smooth and fully combined, about 2-3 minutes. Remove from heat and mix in pure vanilla extract and salt, stirring gently. Gradually add powdered sugar, mixing until the filling is smooth and thick.
Step 2: Shape Eggs
Once the peanut butter filling is ready, use a tablespoon to scoop out portions, roughly 1.5 tablespoons each. Roll each portion into egg shapes, flattening them slightly for a precarious look. Place the shaped eggs on the parchment-lined baking sheet and carefully transfer them to the freezer for about 30 minutes. This will help them firm up, making them easier to coat later.
Step 3: Melt Chocolate
While the peanut butter eggs chill, prepare the chocolate coating. In a microwave-safe bowl, combine milk chocolate chips and vegetable shortening. Heat in the microwave at 50% power in 30-second intervals, stirring after each interval, until the chocolate is completely melted and smooth, taking about 1-2 minutes total. Let the chocolate cool for a few minutes before use, ensuring it’s still pourable but not hot.
Step 4: Coat Eggs
Remove half of the chilled peanut butter eggs from the freezer. Dip each egg into the melted chocolate, ensuring it is fully coated. Lift it out and gently tap to let any excess chocolate drip off before placing it back on the parchment-lined sheet. Repeat this process with the remaining eggs, ensuring a nice, even chocolate coat for your Homemade Peanut Butter Eggs.
Step 5: Set Chocolate
Once all the eggs are coated, transfer the baking sheet to the refrigerator. Allow the chocolate coating to set for 45 minutes to 1 hour, or until it is fully hardened. Keep an eye on the chocolate; it should have a glossy finish and feel firm to the touch when ready. These homemade treats will soon be ready to enjoy!
Storage Tips for Homemade Peanut Butter Eggs
Fridge: Keep your Homemade Peanut Butter Eggs in an airtight container for up to one week. This ensures they stay fresh and maintain their delicious flavor.
Room Temperature: You can store them at room temperature for 3-4 days. Just make sure they are in a cool, dry place away from direct sunlight.
Freezer: For longer storage, freeze your eggs for up to 3 months. Layer them between parchment paper in an airtight container to prevent sticking.
Thawing: When ready to enjoy, simply thaw in the fridge overnight before serving for the best texture and flavor.
What to Serve with Homemade Peanut Butter Eggs?
A delightful no-bake treat deserves equally exciting sides that enhance its sweet, creamy flavors and add to the celebration.
-
Creamy Vanilla Ice Cream: The cool creaminess perfectly balances the rich chocolate and peanut butter flavors, creating a luxurious dessert experience. A scoop on the side or even a drizzle on top makes every bite just a little more indulgent!
-
Fresh Strawberries: The bright, juicy sweetness of strawberries cuts through the richness of the peanut butter eggs. Serve them alongside for a refreshing contrast that brightens up your dessert platter. It’s like a celebration of spring on your plate!
-
Chocolate Milk: A nostalgic classic, chocolate milk pairs wonderfully with these homemade treats, enhancing the chocolate experience. Whether served chilled or warmed, it’s a comforting, familiar drink perfect for dipping.
-
Espresso or Coffee: A rich cup of espresso adds a sophisticated touch, balancing the sweetness with its bold flavor. The combination allows for indulgence in a grown-up kind of way, perfect for an afternoon pick-me-up.
-
Peanut Butter Cookies: For those who can’t get enough of that nutty goodness, pairing these eggs with crispy peanut butter cookies elevates the experience to a whole new level of indulgence. It’s a sweet lover’s dream!
-
Milk Chocolate-Covered Pretzels: For a whimsical twist, these offer both sweet and salty notes. Their crunch and saltiness complement the smooth filling inside the eggs, creating an enjoyable mix of textures.
-
Cocktail Pairings: A light, fruity cocktail like a berry mojito adds a touch of fun and celebration to any gathering, making it a perfect drink to enjoy alongside these delightful candies.
-
Cupcakes: Vanilla or chocolate cupcakes topped with creamy frosting create an indulgent dessert table. Attending a gathering this spring? These treats elevate your homemade peanut butter eggs to show-stopping status!
-
Fruit Salad: A refreshing mix of seasonal fruits adds brightness and lightness to your dessert spread. The freshness of melon, pineapple, and berries contrasts beautifully with the rich, sweet flavors of the eggs.
Homemade Peanut Butter Eggs Variations
Feel free to get creative with your Homemade Peanut Butter Eggs, adding your personal touch to these delightful treats!
-
Nut-Free: Substitute creamy peanut butter with sunflower seed butter for a deliciously nut-free alternative that everyone can enjoy.
-
Vegan Delight: Use dairy-free chocolate chips and coconut oil instead of butter to create a fully vegan version of these tasty eggs.
-
Textured Filling: Fold in crushed pretzels or toffee bits into the peanut butter filling for an exciting crunch that adds a fun twist!
-
Flavored Extracts: Experiment with flavored extracts like almond or hazelnut to give your peanut butter eggs a unique taste that surprises the palate.
-
Chocolate Variety: Swap milk chocolate chips for dark or even white chocolate to create your favorite chocolate-coated version of these eggs.
-
Seasonal Treats: Try adding festive sprinkles or edible glitter on top of the chocolate coating for a fun Easter-themed presentation!
-
Mini Versions: Shape your eggs into mini-bites or truffle-sized portions to create snackable treats perfect for sharing.
This flexibility not only brings joy to your kitchen but also allows you to impress family and friends. Enjoy your creative process and discover additional flavors by pairing these eggs with ideas like Decadent Brown Butter or something savory like Garlic Butter Shrimp. Happy cooking!
Expert Tips for Homemade Peanut Butter Eggs
-
Room Temperature Peanut Butter: Ensure your peanut butter is at room temperature for easier mixing into a smooth filling that enhances flavor.
-
Chocolate Dipping Patience: Take your time when dipping the eggs—tapping off excess chocolate will help achieve a smooth, even coating for your Homemade Peanut Butter Eggs.
-
Firm Filling Trick: For a sturdier filling, refrigerate the mixture for 30 minutes before shaping, making it easier to form into eggs.
-
Avoid Overheating: When melting chocolate, be careful not to overheat, as burning can cause a dull finish. Use a microwave on 50% power for best results.
-
Experiment with Add-Ins: Feel free to customize your filling by adding crushed pretzels or different nut butters for a unique flavor twist!
Make Ahead Options
These Homemade Peanut Butter Eggs are perfect for busy cooks looking to save time during the holidays! You can prepare the filling up to 24 hours in advance; simply follow the steps to create the filling, shape the eggs, and store them in an airtight container in the refrigerator. If you want to take it a step further, you can freeze the shaped eggs for up to 3 months—just be sure to place parchment paper between layers for quality. When you’re ready to serve, dip the frozen eggs in melted chocolate, allow them to set in the refrigerator for about 45 minutes to 1 hour, and enjoy these delicious treats without any fuss!
Homemade Peanut Butter Eggs Recipe FAQs
What type of peanut butter is best for this recipe?
Absolutely! For the best results, use creamy, shelf-stable varieties like Jif or Skippy. These options provide the ideal creamy texture and flavor. Natural peanut butters can be thicker and may change the consistency of your filling.
How should I store the Homemade Peanut Butter Eggs?
I recommend storing your eggs in an airtight container in the refrigerator for up to one week. If you prefer room temperature, they will last 3-4 days, but keep them in a cool, dry place. For longer storage, freeze them for up to 3 months; just be sure to layer them between parchment paper to avoid sticking!
Can I freeze these peanut butter eggs? If so, how?
Yes, definitely! To freeze your Homemade Peanut Butter Eggs, place them in a single layer in an airtight container, ensuring there’s parchment paper between layers. They can be frozen for up to 3 months. When you’re ready to enjoy them, simply thaw in the fridge overnight to maintain their delightful texture.
What if my chocolate coating becomes dull or doesn’t set?
Very well! If your chocolate doesn’t set or appears dull, it may have been overheated. Always melt chocolate in a microwave at 50% power in 30-second intervals, stirring in between. If it has already melted too much, you could try adding a little bit of shortening to thin it out again and recoat your eggs. Patience is key—follow the cooling steps carefully for a shiny finish!
Irresistible Homemade Peanut Butter Eggs for Your Sweet Tooth
Ingredients
Equipment
Method
- Line a baking sheet with parchment paper to prevent sticking.
- In a medium saucepan, combine creamy peanut butter and unsalted butter over medium heat. Stir continuously until smooth and fully combined, about 2-3 minutes.
- Remove from heat and mix in pure vanilla extract and salt. Gradually add powdered sugar, mixing until filling is smooth and thick.
- Scoop out portions of filling, roughly 1.5 tablespoons each, and roll into egg shapes. Flatten slightly and place on the baking sheet. Freeze for 30 minutes.
- In a microwave-safe bowl, combine milk chocolate chips and vegetable shortening. Heat at 50% power in 30-second intervals until melted and smooth, about 1-2 minutes. Let cool slightly.
- Remove half of the eggs from the freezer. Dip each into melted chocolate, ensuring fully coated. Tap off excess before placing back on the sheet. Repeat with remaining eggs.
- Transfer the baking sheet to the refrigerator. Allow chocolate to set for 45 minutes to 1 hour until fully hardened.
Leave a Reply